
The microwave brownie has humble beginnings in the 1980s when microwave ovens became commonplace in American kitchens. Originally developed as a quick dessert solution for busy families, these single-serving treats have evolved into healthier versions that satisfy cravings while providing nutritional benefits. The protein brownie represents a modern twist on this convenience food tradition, combining the comfort of chocolate with the practical benefits of added protein.
Why You'll Love It
-
Ready in just 60 seconds - no waiting for the oven to preheat
-
Packed with protein to keep you satisfied longer
-
Perfect portion control - no temptation to eat a whole pan
-
Uses simple pantry ingredients you probably already have
"My kids actually ask for these instead of regular brownies now - they're that good!"
Essential Ingredient Guide
- Chocolate protein powder: This gives the brownie its rich chocolate flavor and protein boost. Use a quality brand that mixes well - the powder should be fine and not grainy.
- Cocoa powder: Double the chocolate goodness! Natural cocoa works best for that deep brownie flavor. Sift it if it's clumpy.
- Egg: Just one egg binds everything together and adds moisture. Room temperature works best for even mixing.
- Milk or almond milk: This thins the batter to the perfect brownie consistency. Any milk works, but dairy-free options like almond milk keep it light.
- Maple syrup or honey: A touch of natural sweetness that complements the chocolate without being overwhelming.
- Baking powder: Just a pinch gives the brownie that slight lift so it's not too dense.
 Sweet Treats & Desserts
Healthier Hot Chocolate Recipe
Learn how to make a delicious healthier hot chocolate that's perfect for a cozy warm beverage.
Complete Cooking Process
-
Ingredient Readiness:
Measure everything into your mug first - it all happens so fast once you start mixing. The egg should be at room temperature if possible, it blends in smoother that way.
-
Flavor Development:
The magic happens when the chocolate protein powder meets the cocoa powder - that's where the deep brownie flavor builds. Mixing them dry first ensures they're evenly distributed.
-
Texture Control:
The 60-second cook time is everything. Too little and it's gooey in the middle, too much and it gets rubbery. That perfect fudgy texture comes from nailing the timing.
-
Finishing Touches:
Let it rest for a minute after microwaving - hard to wait, I know, but it firms up perfectly and the flavors settle.
-
Serving Timing:
Best eaten warm, right out of the mug. The chocolate is at its most comforting when it's still steaming gently.
-
Use a wide mug for even cooking - tall narrow ones can cook unevenly
-
Don't overmix - just stir until combined, a few lumps are fine
-
Spray the mug with a little cooking spray for easy cleanup
-
Watch it closely - microwave powers vary, start with 60 seconds and add 10-second increments if needed
Pro Tips
I've made this enough times now that I can almost tell by the smell when it's perfectly done. There's this moment when the chocolate scent deepens and you know it's ready.
Honestly, what I love most is how this little brownie feels like such a thoughtful treat. It's not about making a big production - just a quiet moment with something warm and chocolatey that actually feels good for you too.
The essence of the dish:
What makes this special is how it transforms simple ingredients into warm chocolate comfort in literally sixty seconds. It's that moment when you're craving something sweet but don't want to commit to baking a whole batch.
A fun fact or historical angle:
Microwave mug cakes became popular in the 2000s as people discovered they could satisfy dessert cravings almost instantly. This protein version is a modern take on that convenience.
Flavor or sensory focus:
The first bite delivers that rich chocolate warmth that spreads through you. The texture is fudgy but not heavy, with just enough sweetness to feel indulgent.
You Must Know
-
The mug size matters - too small and it overflows, too big and it cooks unevenly
-
Let it cool for a minute before eating - it continues cooking out of the microwave
-
Experiment with add-ins like a few chocolate chips or chopped nuts
-
Perfect for after workouts or as an afternoon pick-me-up
Frequently Asked Questions
→ Can I make this without protein powder?
You can, but you'll need to adjust the recipe. Replace the protein powder with more cocoa powder and a little flour, though the texture will be different.
→ My brownie came out dry - what happened?
Probably overcooked. Microwave powers vary - try 10-15 seconds less next time. Also make sure you're measuring the milk accurately.
→ Can I double this recipe?
Yes, but use a larger microwave-safe bowl instead of a mug. Double the cooking time to about 2 minutes, checking frequently.
→ What's the best protein powder to use?
I prefer whey protein isolate as it mixes well, but plant-based powders work too. Avoid ones with strong artificial flavors.
→ Can I bake this in the oven instead?
Absolutely! Bake at 350°F in a small oven-safe dish for 12-15 minutes. The texture will be more cake-like.
→ How should I store leftovers?
It's best fresh, but you can cover and refrigerate for up to 2 days. Reheat for 15-20 seconds in the microwave.
Nutrition Facts
per serving
280
Calories
25g
Protein
18g
Carbs
12g
Fat
Taste Profile
Rich chocolate flavor with balanced sweetness
Ingredient Substitutions
Don't have an ingredient? Try these alternatives
Use 1/4 cup vanilla protein powder and increase cocoa to 3 tbsp
Use same amount but texture may be slightly different
Adjust to taste - sugar-free options will change sweetness level
Recipe Variations
Try these delicious twists on the original
Peanut Butter Swirl
Swirl a tablespoon of peanut butter into the batter before microwaving for a chocolate-peanut butter combination
Mint Chocolate
Add 1/4 tsp peppermint extract and top with dark chocolate chips for a refreshing twist
Coconut Chocolate
Mix in 2 tablespoons of shredded coconut for tropical flavor and texture
Common Mistakes to Avoid
Learn from others' mistakes for perfect results
- Overmixing the batter - creates toughness
- Using wrong mug size - affects cooking
- Skipping the rest time - texture suffers
- Overcooking - makes it dry and rubbery
Meal Prep & Storage
Make Ahead Tips
You can mix the dry ingredients ahead and store in an airtight container. When ready, just add the wet ingredients and microwave.
Leftover Ideas
Best fresh, but can be refrigerated and reheated. Texture will be denser when cold.
Perfect Pairings
Serve this with...
Cooking Timeline
Measure and mix dry ingredients in mug
Add wet ingredients and mix until combined
Microwave for 60 seconds, watch it rise
Let rest for 1 minute before eating
 Healthy, Simple & Family Cooking
Crispy Keto Onion Rings
A easy, crunchy keto snack that feels indulgent without the carbs.
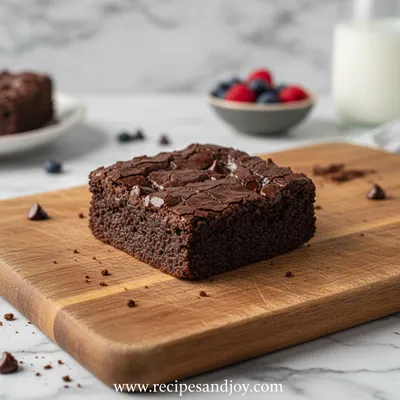
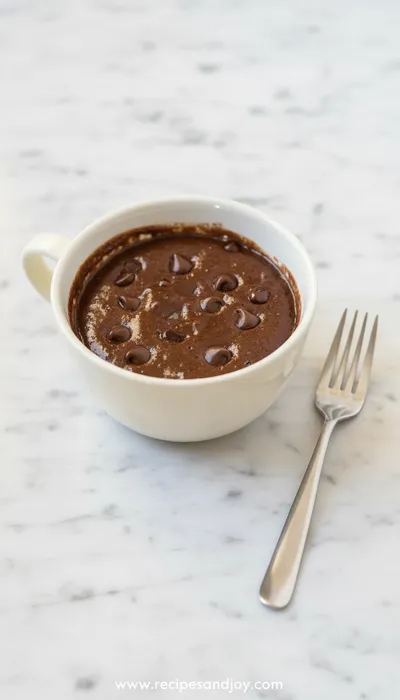
1 Minute Protein Brownie Recipe
A moist, fudgy protein brownie that's ready in just 60 seconds straight from your microwave. Honestly, it feels like finding a little pocket of warmth on a slow afternoon.
Timing
Prep Time
2 Minutes
Cook Time
1 Minute
Total Time
3 Minutes
Recipe Details
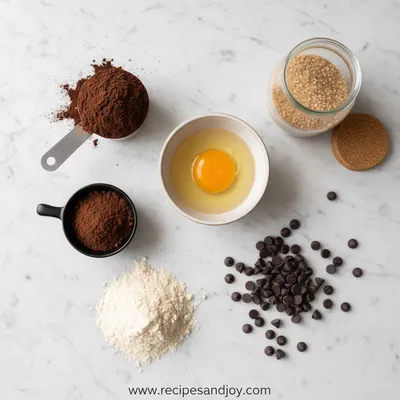
Ingredients
Dry Ingredients
-
01
1/4 cup chocolate protein powder
-
02
2 tbsp cocoa powder
-
03
1 tbsp coconut flour or almond flour
-
04
1/4 tsp baking powder
-
05
Pinch of salt
Wet Ingredients
-
01
1 large egg
-
02
2 tbsp milk or almond milk
-
03
1 tbsp maple syrup or honey
-
04
1/2 tsp vanilla extract
Optional Add-ins
-
01
1 tbsp chocolate chips
-
02
1 tbsp chopped walnuts
-
03
1 tbsp peanut butter swirled on top
Instructions
In a microwave-safe mug (12-16 oz size works best), whisk together the dry ingredients - protein powder, cocoa powder, coconut flour, baking powder, and salt. Make sure there are no lumps.
Add the egg, milk, maple syrup, and vanilla extract. Mix everything together until just combined - don't overmix. A few small lumps are okay. If you're adding chocolate chips or nuts, fold them in now.
Microwave on high for 60 seconds. Watch it rise - it should puff up nicely but not overflow. If your microwave is less powerful, you might need 70-80 seconds. The top should look set and dry to the touch.
Let it sit in the mug for 1 minute before eating. It will continue to cook slightly and firm up. Enjoy warm right from the mug with a spoon!
For an extra treat, you can top with a dollop of Greek yogurt or a drizzle of melted peanut butter. Sometimes I'll sprinkle a few extra chocolate chips on top while it's still warm so they melt slightly.
Notes & Tips
-
1
Make sure your mug is microwave-safe - some ceramics can crack
-
2
Don't skip the resting time - it makes a big difference in texture
-
3
Experiment with different protein powder brands to find your favorite
-
4
Perfect for meal prep - mix dry ingredients ahead and add wet when ready

Tools You'll Need
-
Microwave-safe mug (12-16 oz)
-
Small whisk or fork
-
Measuring spoons
-
Measuring cups
Must-Know Tips
-
Use room temperature ingredients for best mixing
-
Don't overmix the batter - gentle stirring is key
-
Watch closely during cooking - microwave powers vary widely
-
Let it rest before eating for perfect texture
Professional Secrets
-
Sift dry ingredients to avoid lumps
-
Mix wet and dry separately first for even distribution
-
The toothpick test works - it should come out with moist crumbs
-
Undermix rather than overmix for tender texture

Recipe by
Lily AndersonLife is sweeter with dessert 🍰💕 Baking joy, spreading smiles, and loving every sprinkle ✨
Get Delicious Recipes Weekly
Join 25,000+ home cooks getting our best recipes straight to their inbox.
Free forever • No spam • Unsubscribe anytime