
The concept of no-bake confections has roots in early 20th-century American home economics, when resourceful cooks created delicious treats without the need for expensive fuel or extensive equipment. These Butterfinger balls carry on that tradition of simplicity, using common pantry staples to mimic the beloved flavor of a classic candy bar. The combination of peanut butter and crushed crackers creates a surprisingly authentic texture that has pleased generations.
Why You'll Love It
-
- Requires no baking and comes together in minutes
-
- Uses simple ingredients you likely already have
-
- Perfect for making ahead for parties or gifts
-
- The crunchy, sweet texture is incredibly satisfying
"My family can't get enough of these! They disappear faster than I can make them."
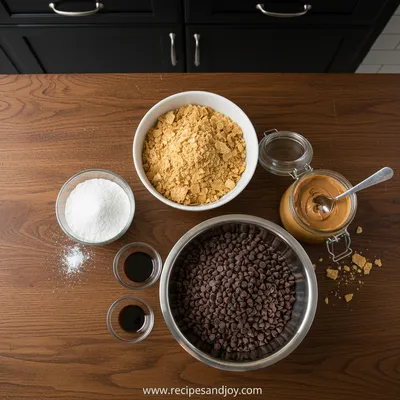
Essential Ingredient Guide
- Peanut Butter: Use creamy peanut butter for the smoothest texture. The oil helps bind the crackers together, creating that familiar Butterfinger crunch.
- Crushed Crackers: Plain salted crackers work best. They provide the essential crispy base that mimics the candy's flaky layers when mixed with the peanut butter.
- Powdered Sugar: This adds sweetness and helps firm up the mixture, making it easier to roll into perfect little balls.
- Chocolate Chips: Semi-sweet or milk chocolate both work wonderfully. Melting it smoothly is key for that glossy, professional-looking coating.
- Vanilla Extract: Just a splash enhances all the other flavors, giving the candy a more rounded, deep taste.
- Butter: A small amount enriches the mixture, helping it hold together and adding a subtle richness.

Complete Cooking Process
-
Ingredient Readiness:
Make sure your peanut butter is at room temperature so it mixes easily. Crush the crackers finely but not into dust—you want little bits for texture.
-
Flavor Development:
The flavors really come together as you mix the peanut butter with the crushed crackers and sugar. It’s amazing how it starts to smell just like the candy bar.
-
Texture Control:
Chilling the balls before dipping is crucial. It firms them up so they don’t fall apart in the warm chocolate.
-
Finishing Touches:
Dipping them in chocolate and letting them set completely gives that satisfying snap when you bite into one.
-
Serving Timing:
These are best served at room temperature so the chocolate is just slightly soft and the inside is firm but not hard.
-
Chill the mixture for at least 30 minutes before rolling—it makes handling so much easier.
-
Use a fork to dip the balls for a neat coating and less mess.
-
If the chocolate starts to thicken, warm it gently for a smoother finish.
-
Sprinkle with a little sea salt on top before the chocolate sets for a fancy touch.
Pro Tips
I’ve found that letting the balls sit in the fridge for a bit after rolling helps them keep their shape. You know, it’s one of those little things you learn after making these a few times. And honestly, if you’re making these for a party, they’re a great make-ahead option. Sometimes I’ll whip up a batch of these when I’m prepping a more involved family meal, so I have something sweet ready to go.
The essence of the dish:
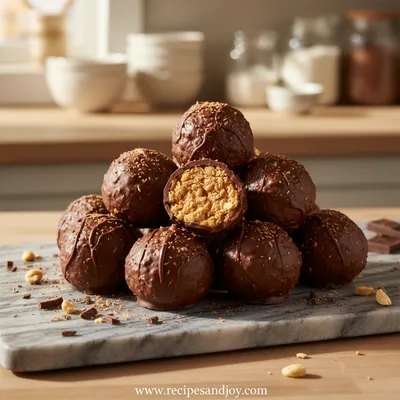
What makes these special is how they capture the essence of a Butterfinger candy bar without any complicated steps. The combination of crunchy crackers and peanut butter creates that unique flaky texture we all love.
A fun fact or historical angle:
No-bake candies became popular during the Great Depression when home cooks needed to create treats without wasting expensive fuel. These Butterfinger balls carry on that tradition of smart, resourceful cooking.
Flavor or sensory focus:
When you bite into one, you'll first notice the snap of the chocolate shell, then the satisfying crunch of the peanut butter mixture inside. It’s a wonderful contrast of textures.
You Must Know
-
The mixture must be chilled before dipping or it will fall apart.
-
Use good quality chocolate for the best flavor and coating.
-
Store these in an airtight container to keep them fresh and crunchy.
Frequently Asked Questions
→ Can I use crunchy peanut butter instead?
You can, but the texture will be different. Creamy peanut butter gives you that smooth base that better mimics the original Butterfinger texture.
→ How long do these keep?
They’ll keep for up to two weeks in an airtight container in the refrigerator. You can also freeze them for up to three months.
→ My mixture is too dry—what should I do?
Add a teaspoon of melted butter or peanut butter at a time until it comes together. It should hold its shape when pressed.
→ Can I use white chocolate instead?
Absolutely! White chocolate makes a nice variation, though the flavor will be sweeter and less like the original candy.
→ What’s the best way to crush the crackers?
I put them in a zip-top bag and roll with a rolling pin. You want some texture, so don’t crush them into complete powder.
→ Can I make these without peanut butter?
You could try another nut butter, but the flavor won’t be the same. Sunflower seed butter might work for a nut-free version.
Nutrition Facts
per serving
150
Calories
3g
Protein
15g
Carbs
9g
Fat
Taste Profile
Sweet and nutty with a rich chocolate finish
Ingredient Substitutions
Don't have an ingredient? Try these alternatives
These will alter the flavor slightly but still provide the necessary crunch.
The flavor will be different, and sunflower seed butter works for nut allergies.
Use an equal amount for a dairy-free version.
Recipe Variations
Try these delicious twists on the original
Cocoa Powder Version
Add 2 tablespoons of cocoa powder to the peanut butter mixture for a deeper chocolate flavor throughout.
Peanut Lover's Version
Mix in 1/4 cup of finely chopped roasted peanuts for extra crunch and peanut flavor.
Common Mistakes to Avoid
Learn from others' mistakes for perfect results
- Not chilling the mixture enough before rolling, leading to misshapen balls.
- Overheating the chocolate, which can cause it to seize and become grainy.
- Using crackers that are too finely crushed, resulting in a pasty texture.
Meal Prep & Storage
Make Ahead Tips
You can make the balls up to 2 days ahead and store them in the refrigerator before dipping. The dipped candies keep well for up to 2 weeks.
Leftover Ideas
Store leftovers in an airtight container in the refrigerator. They are delicious cold or at room temperature.
Perfect Pairings
Serve this with...
Cooking Timeline
Gather and measure all ingredients. Crush the crackers.
Mix the peanut butter, crackers, sugar, vanilla, and butter until combined.
Chill the mixture in the refrigerator to firm up.
Roll into balls, chill again, then dip in melted chocolate and let set.
Butterfinger Balls: Easy No-Bake Candy Recipe
These Butterfinger balls come together with crushed crackers and creamy peanut butter, creating a simple no-bake candy that's perfect for any gathering or quiet afternoon treat.
Timing
Prep Time
20 Minutes
Cook Time
0 Minutes
Total Time
50 Minutes
Recipe Details
Ingredients
For the Balls
-
01
2 cups finely crushed salted crackers
-
02
1 cup creamy peanut butter
-
03
1 cup powdered sugar
-
04
1 teaspoon vanilla extract
-
05
2 tablespoons melted butter
For Coating
-
01
2 cups semi-sweet chocolate chips
-
02
1 tablespoon coconut oil or shortening
Instructions
In a medium bowl, mix together the crushed crackers, peanut butter, powdered sugar, vanilla, and melted butter until well combined. It should come together like a thick dough.
Cover the bowl and chill the mixture in the refrigerator for about 30 minutes. This makes it much easier to handle and roll.
Line a baking sheet with parchment paper. Using your hands, roll the chilled mixture into small balls, about 1 inch in diameter, and place them on the prepared sheet.
Chill the balls again for another 15 minutes while you melt the chocolate. This helps them hold their shape when dipping.
In a microwave-safe bowl, melt the chocolate chips with the coconut oil in 30-second intervals, stirring between each, until smooth and fluid.
Using a fork or dipping tool, dip each ball into the melted chocolate, tapping off the excess, and return them to the parchment-lined sheet.
Let the chocolate set completely at room temperature, or pop them in the refrigerator for about 10 minutes to speed up the process.
Notes & Tips
-
1
Store in an airtight container in the refrigerator for up to two weeks.
-
2
For a extra crunch, you can mix in some finely chopped peanuts with the cracker crumbs.
-
3
If the mixture is too sticky when rolling, dust your hands lightly with powdered sugar.
Tools You'll Need
-
Mixing bowls
-
Measuring cups and spoons
-
Baking sheet
-
Parchment paper
-
Fork or dipping tool
-
Microwave-safe bowl
Must-Know Tips
-
Chill the mixture thoroughly before rolling—it makes all the difference.
-
Don’t skip the coconut oil in the chocolate—it helps it coat smoothly and set with a nice snap.
-
Taste the mixture before rolling and adjust sweetness if needed.
Professional Secrets
-
Room temperature peanut butter mixes more evenly than cold.
-
A double boiler can give you more control when melting chocolate if you're wary of the microwave.
-
Letting the dipped balls set at room temperature prevents condensation that can make the chocolate sticky.

Recipe by
Lily AndersonLife is sweeter with dessert 🍰💕 Baking joy, spreading smiles, and loving every sprinkle ✨
Get Delicious Recipes Weekly
Join 25,000+ home cooks getting our best recipes straight to their inbox.
Free forever • No spam • Unsubscribe anytime