
The Oreo cookie itself has a history stretching back over a century, first introduced in 1912 by the National Biscuit Company. Originally marketed as a 'biscuit with a cream filling,' its design was meant to evoke a sort of elegant, almost ceremonial treat. Over the decades, it became a staple in pantries across America, a symbol of simple, shared pleasures. This no-bake treat, often called Oreo truffles, emerged as a popular way to transform the beloved cookie into an even more decadent, bite-sized indulgence, perfect for potlucks, holidays, and moments when a little sweetness is called for. Its brilliance lies in its accessibility—turning everyday ingredients into something that feels celebratory.
Why You'll Love It
-
Only 3 main ingredients make it incredibly simple.
-
No baking required – perfect for hot summer days or when the oven's broken.
-
Endlessly customizable with different coatings and sprinkles.
-
They taste impressively decadent, like a treat from a fancy bakery.
"My kids can't get enough of these! So easy to make together, and they disappear from the plate in minutes."
Essential Ingredient Guide
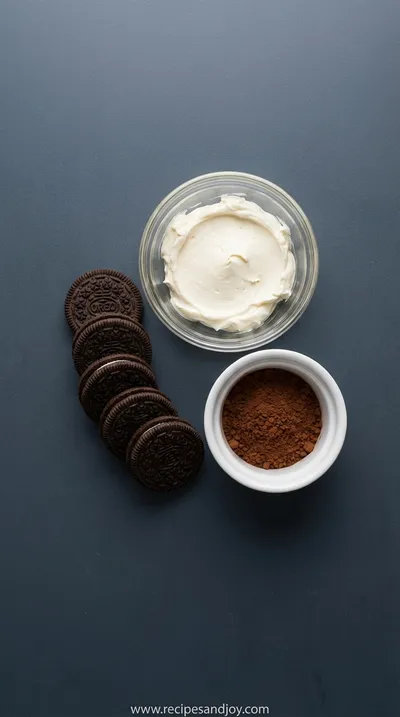
- Oreo Cookies: The heart of the recipe. Use the regular kind for that classic flavor. You'll be crushing the entire cookie—cream filling and all—into fine crumbs. Honestly, the filling is what gives the balls their fudgy, melt-in-your-mouth texture.
- Cream Cheese: This is the binder that brings the crumbs together. Use full-fat, brick-style cream cheese softened to room temperature. It should be soft enough to mix easily but not so warm that it makes the mixture greasy.
- Chocolate Chips: For the coating. Semi-sweet is my go-to for a nice balance that isn't overly sweet, but you can use milk chocolate or dark chocolate depending on your preference. You'll need to melt it gently for a smooth, glossy finish.
- Sprinkles or Toppings: This is where you can have fun. A quick roll in some festive sprinkles, crushed nuts, or even a drizzle of white chocolate adds a beautiful finish and a little extra texture.

Complete Cooking Process
-
Ingredient Readiness:
The cream cheese needs to be soft, left out on the counter for a good hour. Cold cream cheese just won't blend properly with the crumbs. And crushing the Oreos—you want them to be a fine, sandy powder, with no big chunks left.
-
Flavor Development:
The flavor is all in the mixing. As you work the cream cheese into the Oreo crumbs, the chocolate flavor from the cookies melds with the slight tang of the cream cheese. It’s a quiet sort of magic that happens right there in the bowl.
-
Texture Control:
The key moment is when you roll the mixture into balls. Your hands will warm it up, so work quickly. If it gets too sticky, pop the bowl back in the fridge for ten minutes. The final texture is determined by a proper, patient chill before dipping.
-
Finishing Touches:
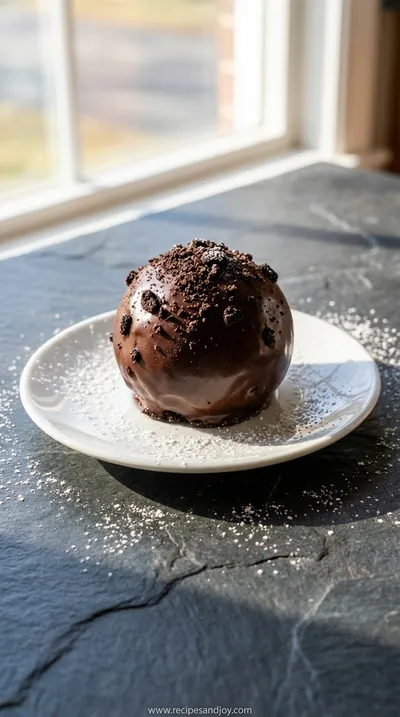
Dipping the chilled balls into melted chocolate is the final act. The chocolate should be just warm enough to coat smoothly but not so hot that it melts the ball. A fork works wonders for dipping and letting the excess chocolate drip off.
-
Serving Timing:
These are best served chilled. The cool, firm texture against the rich chocolate coating is part of the experience. Let them sit out for just a few minutes before serving if you prefer a slightly softer bite.
-
Use a food processor for the quickest, most even crumbs.
-
Chill the rolled balls for at least an hour—overnight is even better—for a firm center that won't fall apart in the chocolate.
-
If the chocolate coating starts to thicken as you dip, gently reheat it in short bursts.
-
Line your baking sheet with parchment paper to prevent sticking.
Pro Tips
You know, I’ve made these in a pinch for unexpected guests, and they always feel like a real treat. The process is slow, methodical. It gives you time to think, to let your mind wander while your hands are busy. The little imperfections—a sprinkle that's a bit off-center, a slightly lopsided ball—just add to the homemade charm. Honestly, that's what makes them special. They're not perfect, but they're made with a quiet kind of care, much like a hearty vegan stew that simmers for hours, building flavor patiently.
The essence of the dish:
It’s the transformation of something ordinary into something wonderful. A package of cookies becomes these elegant, bite-sized confections that feel both nostalgic and new.
A fun fact or historical angle:
The Oreo's iconic design, with its intricate pattern and the word 'Oreo' stamped into the chocolate, was inspired by the Victorian era's love of ornate, medallion-like designs, making each cookie a tiny work of art.
Flavor or sensory focus:
The first thing you'll notice is the snap of the chocolate shell. Then, the cool, creamy, almost fudge-like center melts away, releasing the deep, familiar taste of Oreo cookies. It's a two-part experience in every bite.
You Must Know
Frequently Asked Questions
→ Can I use reduced-fat cream cheese?
I wouldn't recommend it, honestly. Full-fat cream cheese has the right texture and richness to bind the crumbs perfectly. The lower-fat versions can make the mixture too wet or soft, and it might not hold its shape as well when rolling.
→ My mixture is too sticky to roll. What should I do?
Don't worry, that happens. Just pop the whole bowl into the refrigerator for about 15-20 minutes. The cream cheese will firm up a bit, making it much easier to handle. You can also lightly dampen your hands with water to prevent sticking while you roll.
→ Can I make these without a food processor?
Absolutely. Place the cookies in a sturdy zip-top bag and crush them with a rolling pin. It might take a little more muscle, and you'll want to roll it back and forth until you get really fine crumbs. It's a good way to work out a little frustration, I find.
→ How far in advance can I make Oreo balls?
They keep wonderfully. In an airtight container in the fridge, they're good for up to a week. You can also freeze them for up to 3 months. Just thaw them in the refrigerator overnight before serving.
→ What's the best way to melt the chocolate?
A double boiler is best for gentle, even heat. If you don't have one, a heatproof bowl set over a pot of simmering water works perfectly. Microwaving in short bursts and stirring frequently can work too, but it's easier to overheat the chocolate that way.
→ Can I use white chocolate for coating?
Of course! White chocolate creates a beautiful contrast with the dark Oreo center. You could even do a mix—some dipped in dark, some in white—for a festive platter. Just be aware that white chocolate can be a bit trickier to melt smoothly.
Nutrition Facts
per serving
150
Calories
2g
Protein
16g
Carbs
9g
Fat
Taste Profile
A rich, sweet, and deeply chocolatey flavor profile that is classic and comforting.
Ingredient Substitutions
Don't have an ingredient? Try these alternatives
Mascarpone will create an even richer, slightly sweeter center. The texture may be a bit softer, so chill thoroughly.
Dark chocolate will give a less sweet, more intense coating, while milk chocolate will be sweeter and creamier.
Recipe Variations
Try these delicious twists on the original
Peppermint Crunch
Add ½ teaspoon peppermint extract to the cream cheese mixture and roll the dipped balls in crushed candy canes for a festive holiday version.
Cookies and Cream
Use white chocolate for dipping and immediately sprinkle with additional Oreo crumbs for a double-dose of cookies and cream flavor.
Peanut Butter Lover's
Stir ¼ cup of smooth peanut butter into the cream cheese mixture along with the Oreo crumbs for a rich, nutty twist.
Common Mistakes to Avoid
Learn from others' mistakes for perfect results
- Using cold cream cheese, which leads to a lumpy, difficult-to-mix dough.
- Not chilling the balls long enough, causing them to fall apart in the warm chocolate.
- Overheating the chocolate, which causes it to seize and become thick and grainy.
Meal Prep & Storage
Make Ahead Tips
You can make the rolled, un-dipped balls and freeze them on the baking sheet. Once frozen solid, transfer to a zip-top bag. Dip them straight from the freezer when you're ready, adding a minute or two to the setting time for the chocolate.
Leftover Ideas
Leftovers should be stored in the refrigerator. They are best enjoyed cold. The texture remains perfect for several days.
Perfect Pairings
Serve this with...
Cooking Timeline
Crush Oreos and mix with cream cheese until a uniform dough forms.
Portion and roll the mixture into balls, placing them on a parchment-lined sheet.
Chill the balls in the freezer until very firm.
Melt chocolate and dip each chilled ball, adding toppings.
Allow chocolate coating to set completely at room temperature or in the fridge.
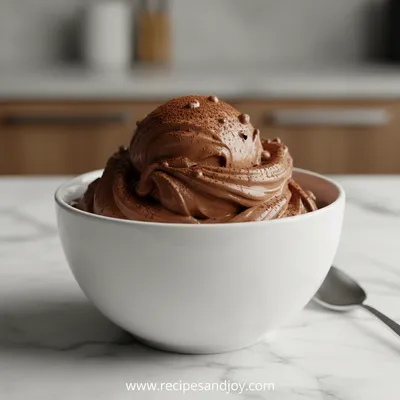
Easy Oreo Balls Recipe: Homemade Chocolate Treats
Honestly, making these Oreo balls feels like sharing a little secret. They're these perfect little bites of chocolatey bliss, made with just a few simple things you probably have right in your kitchen. No oven needed, just some patience while they chill. They remind me of the treats my aunt used to bring over during the holidays, always wrapped in foil and tucked into a tin.
Timing
Prep Time
30 Minutes
Cook Time
0 Minutes
Total Time
2 Hours 30 Minutes
Recipe Details
Ingredients
Main Ingredients
-
01
1 package (14.3 oz) regular Oreo cookies
-
02
8 ounces full-fat brick-style cream cheese, softened to room temperature
-
03
2 cups semi-sweet chocolate chips (about 12 oz)
For Topping (Optional)
-
01
¼ cup festive sprinkles
-
02
2 tablespoons crushed nuts (like peanuts or pecans)
-
03
2 ounces white chocolate, melted for drizzling
Instructions
Place the entire package of Oreo cookies (cream filling included) into a food processor. Pulse until you have a fine, uniform crumb. If you don't have a processor, put the cookies in a large zip-top bag and crush them with a rolling pin until finely ground. Transfer the crumbs to a large mixing bowl.
Add the softened cream cheese to the Oreo crumbs. Use a hand mixer on low speed, or a sturdy spatula, to mix until everything is completely combined and a thick, uniform dough forms. It will be very thick and fudgy. Scrape down the sides of the bowl to make sure there are no dry spots.
Line a baking sheet with parchment paper. Using a small cookie scoop or a tablespoon measure, portion out the mixture. Roll each portion between your palms into a smooth, round ball. If the mixture gets too sticky, chill it for 15 minutes first. Place each ball on the prepared baking sheet.
Once all the balls are rolled, place the entire baking sheet into the freezer. Chill for at least 1 hour, or up to overnight. This step is crucial for a firm center that won't fall apart when dipped.
When ready to dip, melt the chocolate chips. Use a double boiler or a heatproof bowl set over a pan of gently simmering water. Stir frequently until the chocolate is smooth and melted. Remove from heat. You can also melt in the microwave in 30-second intervals, stirring well between each, until smooth.
Remove the balls from the freezer. Using a fork or a dipping tool, submerge one ball at a time into the melted chocolate, tapping the fork gently on the side of the bowl to let the excess chocolate drip off. Return the dipped ball to the parchment-lined sheet.
If you're adding sprinkles or other toppings, sprinkle them on immediately after dipping, before the chocolate sets. If the chocolate in the bowl starts to thicken, gently reheat it for a few seconds.
Once all balls are dipped, let them sit at room temperature until the chocolate is fully set, or transfer the sheet to the refrigerator to speed up the process. Once set, they are ready to serve! Store any leftovers in an airtight container in the fridge.
Notes & Tips
-
1
For a neater finish, use two forks to roll the ball in the chocolate and lift it out, allowing excess to drip through the tines.
-
2
These are perfect for gifting! Place them in mini cupcake liners in a festive box or tin.
-
3
You can use different flavors of Oreos for variety, like mint or peanut butter.
Tools You'll Need
-
Food Processor or Zip-Top Bag and Rolling Pin
-
Mixing Bowls
-
Hand Mixer or Spatula
-
Baking Sheet
-
Parchment Paper
-
Fork or Dipping Tool
-
Double Boiler or Heatproof Bowl
Must-Know Tips
-
Chill the balls thoroughly, A firm, cold center is essential for easy dipping and a perfect texture.
-
Don't overheat the chocolate, Heat it gently and stir often to avoid seizing or becoming grainy.
-
Work in batches if needed, If your kitchen is warm, keep most of the balls in the fridge and only take out a few at a time to dip.
Professional Secrets
-
Room temperature cream cheese, Ensures smooth, even mixing without lumps.
-
Fine, even crumbs, Creates a smooth texture in the finished ball.
-
A thin chocolate coating, Allows the Oreo flavor to shine through without being overwhelming.

Recipe by
Lily AndersonLife is sweeter with dessert 🍰💕 Baking joy, spreading smiles, and loving every sprinkle ✨
Get Delicious Recipes Weekly
Join 25,000+ home cooks getting our best recipes straight to their inbox.
Free forever • No spam • Unsubscribe anytime