
The concept of enclosing savory fillings in dough dates back centuries across many cultures, from Chinese bao to Italian calzones. These cheeseburger bombs represent a modern American twist on this timeless technique, combining beloved burger ingredients with the convenience of baked dough. The garlic-parmesan combination gained widespread popularity in the mid-20th century as Italian-American cuisine became mainstream, creating a flavor profile that feels both familiar and exciting. This recipe captures that perfect balance of comfort food nostalgia and contemporary ease.
Why You'll Love It
-
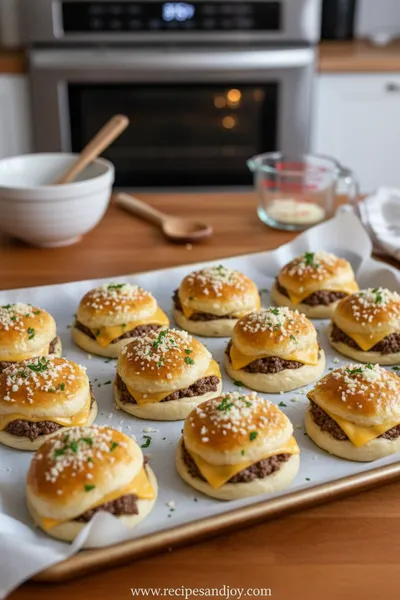
Perfect hand-held snack for game days or parties
-
Combines all your favorite burger flavors in one bite
-
Baked instead of fried for a lighter option
-
Easy to make ahead and reheat beautifully
My kids said these were even better than regular burgers! They disappeared in minutes.
Essential Ingredient Guide
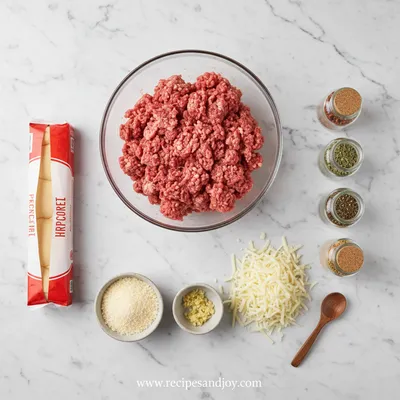
- Ground beef: I use 85/15 lean-to-fat ratio - it has enough richness but doesn't make the bombs too greasy. Honestly, you want that beefy flavor to shine through.
- Refrigerated biscuit dough: The kind in the tube works perfectly. It's soft and pliable, and honestly, it saves so much time. Look, I've made them with homemade dough too, but sometimes quick is just what you need.
- Fresh garlic: Don't even think about the jarred stuff here. You want that fresh, pungent aroma that fills your kitchen. I mean, it's right there in the name.
- Parmesan cheese: Freshly grated makes all the difference. The pre-shredded stuff has anti-caking agents that can make it a bit grainy. Yeah, I know it's extra work, but it's worth it.
- Worcestershire sauce: This little splash gives that umami depth that makes it taste like a real burger. It's subtle but so important.
- Italian seasoning: A simple blend that ties everything together without overpowering. You could make your own, but the store-bought mix works just fine.

Complete Cooking Process
-
Ingredient Readiness:
You'll want to have your beef browned and cooled slightly, your garlic minced, and cheese grated before you even think about opening that biscuit dough. The dough warms up fast in your hands, so having everything ready means you can work quickly.
-
Flavor Development:
When you sauté the garlic with the beef, that's where the magic starts. The garlic softens and mellows, infusing the meat with its aroma. Then when you add the Worcestershire and seasonings, they soak into the beef while it's still warm.
-
Texture Control:
The key is not overworking the dough when you're forming the bombs. Gentle stretching, just enough to encase the filling without making the dough tough. And spacing them properly on the baking sheet so they have room to puff up.
-
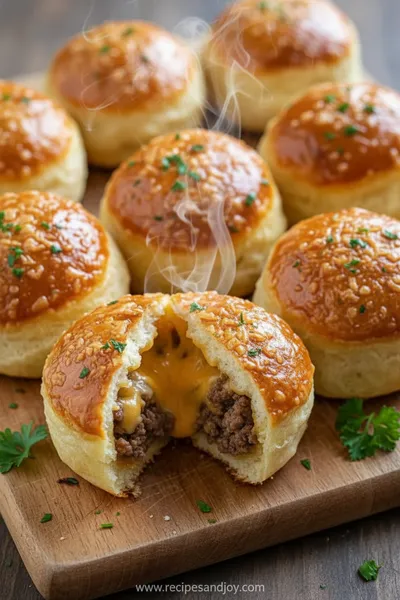
Finishing Touches:
That extra sprinkle of parmesan and parsley right before baking creates a beautiful golden crust. Sometimes I add a tiny dot of butter on top too, just to help it brown nicely.
-
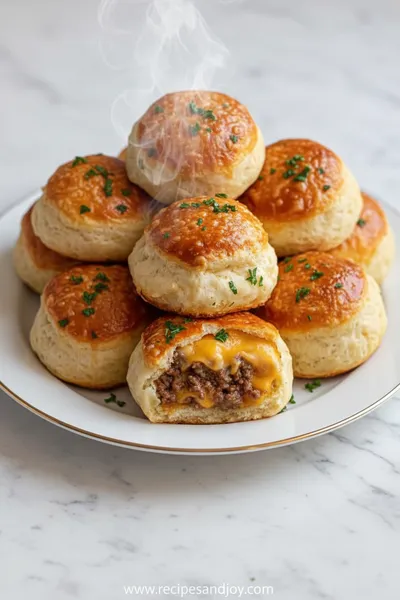
Serving Timing:
These are best served warm from the oven when the cheese inside is still gooey. But honestly, they're pretty good at room temperature too, which makes them great for parties.
-
Chill the filling for 15 minutes before assembling - it makes handling much easier
-
Don't overfill the bombs - about 1 tablespoon of filling per biscuit is perfect
-
Seal the edges tightly by pinching the dough together firmly
-
Brush with melted butter before baking for extra golden color
Pro Tips
I remember the first time I made these, I got a little overzealous with the filling. They burst open in the oven and created quite the mess. So yeah, less is more here. The biscuit dough expands beautifully around the filling if you give it room.
Another thing - if you're making these for a crowd, you can assemble them a couple hours ahead and keep them refrigerated until baking time. They might need an extra minute or two in the oven if they go in cold, but they hold up really well. Honestly, they've become my go-to for potlucks and game days.

The essence of the dish:
These bombs capture everything you love about a cheeseburger - the savory beef, the melty cheese, that garlicky kick - but in a convenient, shareable package. They're like little pockets of comfort that feel special but are actually quite simple to make.
A fun fact or historical angle:
The concept of 'burger balls' or 'cheeseburger bites' became popular in American home cooking during the 1990s, as busy families looked for fun ways to reinvent classic dishes. They represent that clever home cook innovation of making something familiar feel new again.
Flavor or sensory focus:
When you bite into one, you get that slight crispness from the baked biscuit exterior, then the soft, savory filling bursts with garlic and beef flavors, followed by the salty richness of melted parmesan. It's a textural journey in one small package.
You Must Know
-
The filling should be completely cooled before wrapping in dough
-
Seal edges thoroughly to prevent cheese leakage during baking
-
Bake until golden brown - underbaking leads to doughy centers
-
Let rest 5 minutes before serving - the filling is lava-hot
Frequently Asked Questions
→ Can I use different cheeses?
Absolutely. Mozzarella gives that classic stretchy melt, cheddar adds sharpness, or try provolone for something different. Just make sure it's a good melting cheese.
→ How do I prevent them from bursting open?
Cool the filling completely, don't overfill, and really pinch those seams well. A little water on your fingertips can help seal the dough edges together.
→ Can I make these ahead of time?
Yes! Assemble them, place on baking sheet, cover and refrigerate up to 8 hours. Add 2-3 minutes to baking time if going in cold.
→ What dipping sauces work well?
Marinara for an Italian twist, ranch dressing for classic burger vibes, or even a simple garlic aioli. They're good plain too.
→ Can I freeze these bombs?
After baking and cooling, freeze on a sheet then transfer to bags. Reheat in oven at 350°F for 10-12 minutes until warm.
→ What if I don't have biscuit dough?
Pizza dough works great too - roll it out and cut into squares. You might need to adjust baking time slightly as it's thicker.
Nutrition Facts
per serving
285
Calories
14g
Protein
22g
Carbs
16g
Fat
Taste Profile
Savory, cheesy, garlic-forward with rich beef notes
Ingredient Substitutions
Don't have an ingredient? Try these alternatives
May need extra seasoning as poultry is milder in flavor
Similar salty, hard cheese profile works well
Recipe Variations
Try these delicious twists on the original
BBQ Bacon Version
Add 1/4 cup cooked crumbled turkey ham and 2 tbsp BBQ sauce to filling
Pizza Bombs
Use mozzarella cheese and add 2 tbsp pizza sauce and pepperoni pieces
Common Mistakes to Avoid
Learn from others' mistakes for perfect results
- Using warm filling - causes dough to become greasy and hard to seal
- Overfilling bombs - leads to bursting during baking
- Not sealing edges properly - filling leaks out
- Overbaking - makes biscuits dry and tough
Meal Prep & Storage
Make Ahead Tips
Assemble bombs up to 8 hours ahead and refrigerate covered. Bake as directed, adding 2-3 minutes if going in cold. Filling can be made 2 days ahead and refrigerated.
Leftover Ideas
Reheat in oven or air fryer to maintain crisp texture. Microwave will make them soft. Great chopped up over salad the next day.
Perfect Pairings
Serve this with...
Cooking Timeline
Brown beef with garlic, add seasonings, cool filling
Preheat oven, prepare biscuit dough, assemble bombs
Brush with butter, add toppings, bake until golden
Rest bombs 5 minutes, prepare serving platter
Serve warm with dipping sauces

Garlic Parmesan Cheeseburger Bombs Recipe
Savory baked appetizer bombs packed with cheesy, beefy flavor that the whole family will adore. Perfect for game day or weeknight dinners.
Timing
Prep Time
20 Minutes
Cook Time
15 Minutes
Total Time
35 Minutes
Recipe Details
Ingredients
For the Filling
-
01
1 lb ground beef (85/15 lean-to-fat ratio)
-
02
3 cloves garlic, minced
-
03
1/2 cup freshly grated parmesan cheese
-
04
1 tbsp Worcestershire sauce
-
05
1 tsp Italian seasoning
-
06
1/4 tsp black pepper
-
07
1/4 tsp salt
For Assembly
-
01
1 can (16.3 oz) refrigerated biscuit dough (8 biscuits)
-
02
2 tbsp melted butter
-
03
2 tbsp additional parmesan for topping
-
04
1 tbsp fresh parsley, chopped
Instructions
In a skillet over medium heat, brown the ground beef with minced garlic, breaking it up as it cooks. Drain any excess fat if needed. Stir in Worcestershire sauce, Italian seasoning, pepper, and salt. Remove from heat and stir in 1/2 cup parmesan. Let cool completely.
Preheat oven to 375°F (190°C). Line a baking sheet with parchment paper. Separate biscuit dough into 8 biscuits. Flatten each biscuit into a 4-inch circle using your hands or a rolling pin.
Place about 2 tablespoons of the cooled beef mixture in the center of each dough circle. Bring the edges up and over the filling, pinching firmly to seal. Place seam-side down on prepared baking sheet.
Brush tops with melted butter and sprinkle with additional parmesan and parsley. Bake for 12-15 minutes until golden brown and puffed. Let cool 5 minutes before serving.
Serve warm with your favorite dipping sauces. They're perfect alongside a simple salad or as part of a larger spread with other easy dinner options.
Notes & Tips
-
1
For extra flavor, sauté 1/4 cup finely chopped onion with the beef
-
2
If using low-fat beef, you might want to add 1 tbsp olive oil to keep it moist
-
3
These reheat well in air fryer at 350°F for 3-4 minutes
-
4
Freeze unbaked bombs on baking sheet first, then transfer to freezer bags

Tools You'll Need
-
Large skillet
-
Baking sheet
-
Parchment paper
-
Mixing bowls
-
Measuring spoons
-
Pastry brush
Must-Know Tips
-
Cool filling completely - warm filling melts dough too quickly
-
Don't overwork biscuit dough - handle gently for tender results
-
Seal edges tightly - use water if needed to help dough stick
Professional Secrets
-
Chill assembled bombs 10 minutes before baking - helps hold shape
-
Use room temperature dough - easier to stretch without tearing
-
Bake on middle rack - ensures even browning

Recipe by
Isabella MooreFood makes every celebration brighter 🎉🍽️ Creating magical seasonal moments with delicious recipes ✨
Get Delicious Recipes Weekly
Join 25,000+ home cooks getting our best recipes straight to their inbox.
Free forever • No spam • Unsubscribe anytime