
Red velvet cake's origins trace back to the Victorian era, where the reaction between natural cocoa powder and acidic ingredients created a distinctive reddish hue. During World War II, bakers began using beet juice to enhance the color when food rationing limited cocoa supplies. Today, these gluten-free waffles carry forward that tradition of making something beautiful and delicious with thoughtful ingredient combinations, perfect for those seeking healthy family cooking options that don't sacrifice flavor.
Why You'll Love It
-
Naturally gluten-free with a tender, cake-like texture
-
Perfect for special occasions or weekend treats
-
Beautiful crimson color that delights everyone
-
Easy to make ahead and reheat for busy mornings
"My family can't get enough of these waffles! They're so moist and flavorful, no one even notices they're gluten-free."
Essential Ingredient Guide
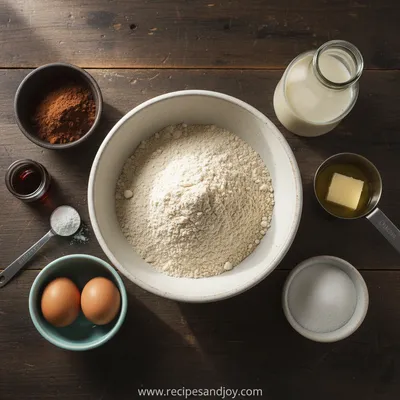
- Gluten-free flour blend: Choose a high-quality blend with xanthan gum for the best texture. I've found that the ones with rice flour and potato starch work beautifully here.
- Natural cocoa powder: Use unsweetened cocoa for that authentic red velvet flavor. It reacts with the vinegar to create the signature color.
- Buttermilk: This adds tenderness and helps activate the baking soda. If you don't have buttermilk, you can make your own with milk and vinegar.
- Apple cider vinegar: Just a tablespoon enhances the color and balances the sweetness. It's one of those little secrets that makes all the difference.
- Vanilla extract: Use real vanilla for the best flavor. That warm, aromatic note is what makes red velvet so distinctive.
- Natural red food coloring: I prefer beet powder or natural food coloring for that vibrant color without artificial ingredients.
Complete Cooking Process
-
Ingredient Readiness:
Let your eggs and buttermilk come to room temperature - cold ingredients can make the batter seize up. Honestly, I sometimes forget this step and end up with lumpy batter, so I've learned to set everything out about 30 minutes before I start.
-
Flavor Development:
The magic happens when the cocoa, vinegar, and buttermilk mingle. That chemical reaction creates the signature red velvet flavor and color. I love watching the batter transform from brown to that deep red hue.
-
Texture Control:
Don't overmix the batter - a few lumps are fine. Overmixing develops the gluten-free flours too much and can make the waffles tough instead of tender.
-
Finishing Touches:
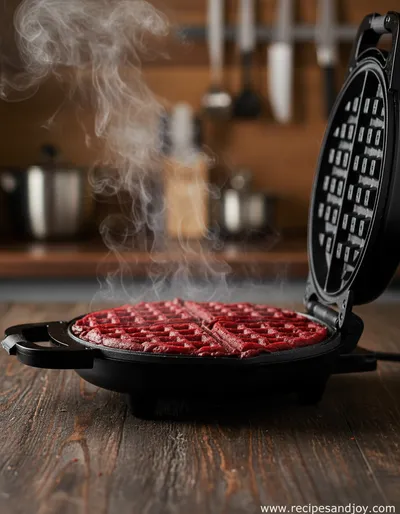
Let the waffles rest in the waffle iron until the steam stops. That crisp exterior with the soft interior is what makes them perfect.
-
Serving Timing:
Serve immediately for the crispiest texture, or keep warm in a single layer on a baking sheet in the oven. They're best when the cream cheese topping is slightly melted into the warm waffles.
-
Spray the waffle iron between each batch to prevent sticking
-
Use a ladle for consistent portion sizes
-
Don't peek too early - wait for the steam to slow down
-
Keep finished waffles warm in a 200°F oven
Pro Tips
I've burned my share of waffles over the years, honestly. The key is getting to know your waffle iron - they all have their own personality. Mine takes about 4 minutes per batch, but yours might be different.
Another thing I've learned is that letting the batter rest for 5-10 minutes after mixing helps the flours hydrate properly. It makes for a more tender waffle that doesn't tear when you open the iron. Little pauses like that make all the difference in cooking, don't they?

The essence of the dish:
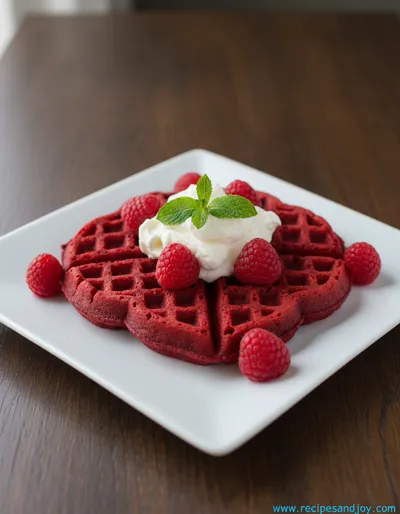
What makes these waffles special is how they transform a classic dessert flavor into a breakfast treat without compromising on texture or taste. The balance between the slight tang from the buttermilk and the rich cocoa creates that unmistakable red velvet experience.
A fun fact or historical angle:
Red velvet cake became especially popular in the South during the Great Depression, when resourceful home cooks used beet juice to enhance the color naturally. This tradition of making something beautiful from simple ingredients continues with these waffles.
Flavor or sensory focus:
The first thing you'll notice is the beautiful crimson color, followed by the warm chocolate aroma. When you bite in, it's that soft, cake-like texture with just the right amount of crispness on the outside that makes these so memorable.
You Must Know
-
Use room temperature ingredients for smooth batter
-
Don't overmix - lumps are better than tough waffles
-
Let the waffle iron preheat fully before starting
-
The color develops as the batter rests
Frequently Asked Questions
→ Can I make the batter ahead of time?
You can mix the dry ingredients the night before, but I'd wait to add the wet ingredients until morning. The batter is best used within an hour of mixing.
→ What's the best gluten-free flour blend?
I've had great results with blends that contain rice flour, potato starch, and tapioca flour. They mimic the texture of traditional flour beautifully.
→ Can I freeze these waffles?
Absolutely! Let them cool completely, then freeze in a single layer before storing in bags. Reheat in the toaster for best results.
→ What can I use instead of buttermilk?
Mix 1 cup milk with 1 tablespoon vinegar or lemon juice and let it sit for 5 minutes. It works just as well for the reaction needed.
→ Why did my waffles turn out brown instead of red?
The color develops with the chemical reaction. Make sure your baking soda is fresh and you're using enough natural coloring for that vibrant hue.
→ Can I make these without eggs?
You can try using flax eggs, but the texture will be denser. The eggs help create that light, airy structure we love in waffles.
Nutrition Facts
per serving
280
Calories
6g
Protein
38g
Carbs
12g
Fat
Taste Profile
Rich chocolate flavor with subtle tang from buttermilk
Ingredient Substitutions
Don't have an ingredient? Try these alternatives
Mix 1 3/4 cups milk with 1 tablespoon vinegar, let sit 5 minutes
Use same amount for dairy-free version
Recipe Variations
Try these delicious twists on the original
Chocolate Chip Version
Add 1/2 cup mini chocolate chips to the batter for extra chocolate flavor
Cream Cheese Swirl
Drop spoonfuls of sweetened cream cheese onto the batter before closing the waffle iron
Common Mistakes to Avoid
Learn from others' mistakes for perfect results
- Using cold ingredients results in lumpy batter
- Overmixing makes waffles tough
- Opening the iron too early causes waffles to tear
- Stacking hot waffles makes them soggy
Meal Prep & Storage
Make Ahead Tips
You can mix the dry ingredients up to 2 days ahead. The complete batter is best used within an hour of mixing for optimal rise and texture.
Leftover Ideas
Reheat in toaster or oven at 350°F for 5-7 minutes to restore crispness. Perfect for quick breakfasts throughout the week.
Perfect Pairings
Serve this with...
Cooking Timeline
Preheat waffle iron and mix dry ingredients
Combine wet ingredients and mix batter
Let batter rest while iron heats fully
Cook waffles in batches, about 4 minutes each
Serve immediately with desired toppings
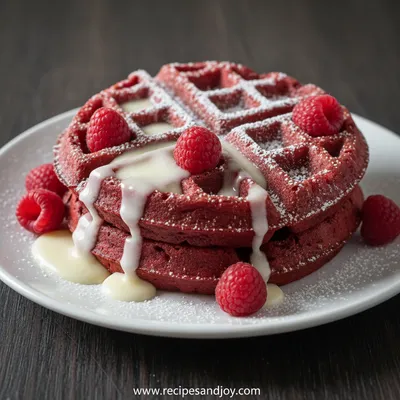
Gluten Free Red Velvet Waffles
These gluten free red velvet waffles bring a touch of celebration to your breakfast table with their deep crimson color and rich, chocolatey flavor that pairs perfectly with creamy toppings.
Timing
Prep Time
15 Minutes
Cook Time
20 Minutes
Total Time
35 Minutes
Recipe Details
Ingredients
Dry Ingredients
-
01
2 cups gluten-free flour blend
-
02
1/2 cup natural cocoa powder
-
03
1/2 cup sugar
-
04
2 teaspoons baking powder
-
05
1/2 teaspoon baking soda
-
06
1/2 teaspoon salt
Wet Ingredients
-
01
2 large eggs, room temperature
-
02
1 3/4 cups buttermilk, room temperature
-
03
1/2 cup melted butter or coconut oil
-
04
1 tablespoon apple cider vinegar
-
05
2 teaspoons vanilla extract
-
06
1-2 tablespoons natural red food coloring or beet powder
For Serving
-
01
Cream cheese glaze or whipped cream
-
02
Fresh berries
-
03
Maple syrup
-
04
Powdered sugar for dusting
Instructions
Preheat your waffle iron according to manufacturer's instructions. In a large bowl, whisk together all the dry ingredients - the gluten-free flour, cocoa powder, sugar, baking powder, baking soda, and salt. Make sure there are no lumps.
In another bowl, whisk the eggs until light and frothy. Add the buttermilk, melted butter, vinegar, vanilla, and red food coloring. Whisk until everything is well combined and the color is evenly distributed.
Pour the wet ingredients into the dry ingredients and stir gently until just combined. Don't overmix - a few lumps are perfectly fine. Let the batter rest for 5-10 minutes while the waffle iron finishes heating.
Lightly grease the waffle iron with cooking spray or butter. Pour about 1/2 cup of batter onto the center of the iron, close the lid, and cook according to your iron's instructions, usually 3-5 minutes, until the waffles are crisp and cooked through.
Carefully remove the waffles and place them on a wire rack instead of stacking them - this keeps them crisp. Continue with the remaining batter, greasing the iron between batches as needed.
Serve immediately with your favorite toppings. I love them with a simple cream cheese glaze and fresh berries for that classic red velvet experience.
Notes & Tips
-
1
The batter thickens as it rests - this is normal
-
2
Leftover waffles freeze beautifully for up to 3 months
-
3
For extra chocolate flavor, add 1/2 cup chocolate chips to the batter
-
4
If the batter seems too thick, add a tablespoon more buttermilk
Tools You'll Need
-
Waffle iron
-
Large mixing bowls
-
Whisk
-
Measuring cups and spoons
-
Wire cooling rack
-
Ladle or measuring cup for batter
Must-Know Tips
-
Room temperature ingredients blend better and create smoother batter
-
Don't open the waffle iron too early - wait for the steam to slow down
-
Let cooked waffles rest on a rack instead of stacking to maintain crispness
Professional Secrets
-
Resting the batter allows the flours to hydrate properly
-
The chemical reaction between cocoa and acid creates the signature color
-
A hot waffle iron creates that perfect crisp exterior

Recipe by
Lily AndersonLife is sweeter with dessert 🍰💕 Baking joy, spreading smiles, and loving every sprinkle ✨
Get Delicious Recipes Weekly
Join 25,000+ home cooks getting our best recipes straight to their inbox.
Free forever • No spam • Unsubscribe anytime