
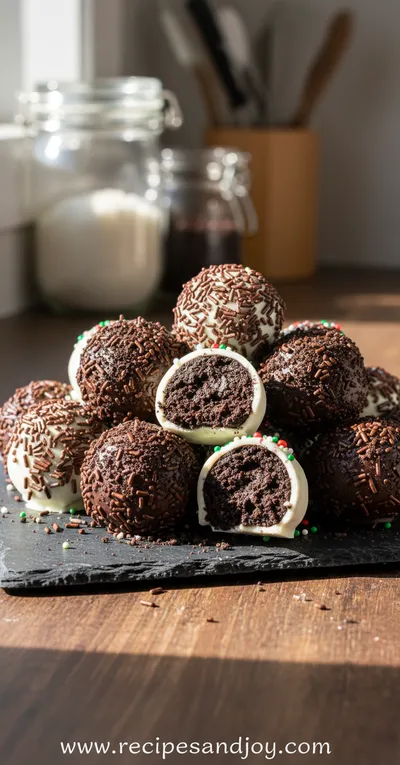
The concept of blending cookies with cheese for a confection has roots in various no-bake traditions, but the Oreo truffle as we know it became a beloved American classic in the late 20th century. Its appeal lies in transforming a pantry staple into an elegant, bite-sized indulgence, perfect for potlucks, holidays, and moments when you crave something special without turning on the oven.
Why You'll Love It
-
- Incredibly simple, no baking required – just mix, roll, and dip.
-
- Uses just three main ingredients you probably already have.
-
- Perfect for making ahead, freeing up your time for other comfort food preparations.
-
- Impressively delicious, they look and taste far more complex than they are.
'My kids devoured these! So easy and so decadent. We'll be making them for every holiday from now on.'
Essential Ingredient Guide
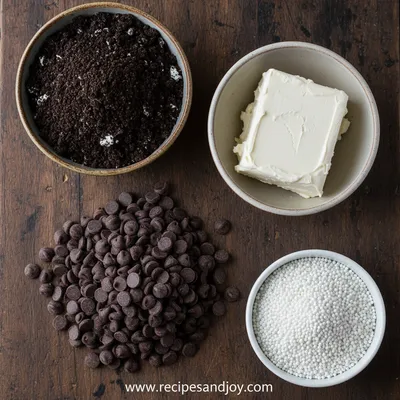
- Oreo Cookies: The heart of the truffle. Use the classic variety for that familiar chocolate and cream flavor. You'll need the whole cookie, filling and all, for the right texture and sweetness.
- Cream Cheese: This is what binds everything together and adds a lovely, subtle tang that balances the sweetness. Make sure it's softened to room temperature so it blends smoothly with the cookie crumbs.
- Chocolate Melting Wafers: These are ideal for a smooth, firm coating that sets nicely. You can use dark, milk, or semi-sweet chocolate depending on your preference. Honestly, they all work wonderfully.
- Sprinkles or Toppings: While optional, a little sprinkle of color or crushed cookies on top makes them look festive. Add them right after dipping, before the chocolate sets.

Complete Cooking Process
-
Ingredient Readiness:
The most important step is letting the cream cheese soften on the counter. Trying to mix it cold just makes a lumpy mess. And crushing the Oreos finely, I mean really fine, gives you that perfect, fudgy texture inside.
-
Flavor Development:
The flavor really comes together when the cream cheese and cookie crumbs rest together. That little bit of time in the fridge lets the flavors mingle and deepens the chocolate taste, much like you'd let a good lemon soup simmer.
-
Texture Control:
Chilling the rolled balls is non-negotiable. It makes them firm enough to handle for dipping without falling apart in the warm chocolate. A cold truffle meets warm chocolate creates that perfect, snap-able shell.
-
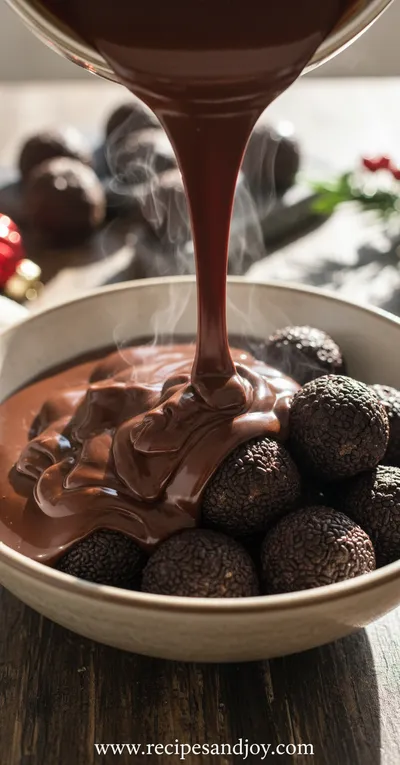
Finishing Touches:
The final dip is where the magic happens. Drizzling a little extra chocolate over the top or adding sprinkles while it's still wet gives them that professional, finished look.
-
Serving Timing:
These are best served chilled, straight from the fridge. The cool, creamy center against the crisp chocolate shell is just perfect. They're a wonderful, easy dessert to serve after a more savory main course.
-
Use a food processor for the Oreos. It gets them fine and sandy, which is just what you want.
-
A small cookie scoop is your best friend for making evenly sized truffles.
-
If the mixture is too sticky, chill it for 10-15 minutes before rolling.
-
Melt your chocolate in short bursts in the microwave, stirring well between each, to avoid burning.
Pro Tips
I still mess up the dipping sometimes, my fingers get a little chocolatey, but honestly, it's part of the fun. The key is to work quickly once the chocolate is melted. It’s a forgiving recipe, though. Even if they’re not perfectly round, they’ll still taste amazing. I often think about how satisfying it is to pull a tray of these out of the fridge, all shiny and ready to share. They’re a little bit of effort that feels like a lot of reward.
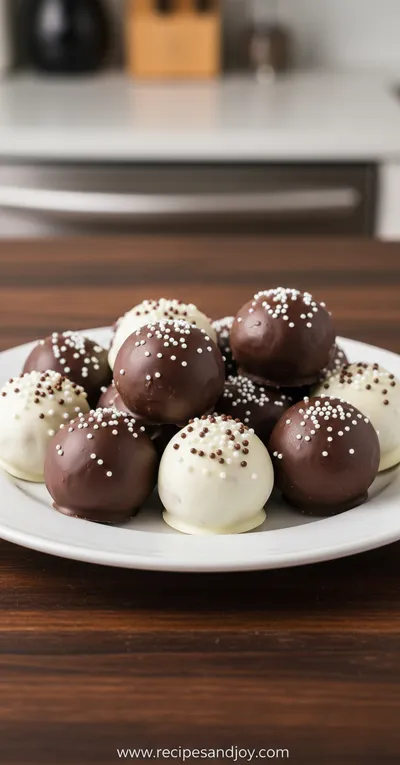
The essence of the dish:
What makes these truffles so special is their beautiful simplicity. They transform humble ingredients into something that feels luxurious and celebratory. The contrast between the rich, creamy interior and the snappy chocolate shell is pure joy.
A fun fact or historical angle:
While truffles traditionally refer to a gourmet fungus or a fine chocolate confection, this no-bake version using Oreos became a viral sensation in the early days of online recipe sharing, a testament to its foolproof and crowd-pleasing nature.
Flavor or sensory focus:
When you bite into one, you'll first notice the crisp break of the chocolate coating, followed immediately by the cool, dense, and intensely chocolatey center. It's a rich, sweet experience that melts in your mouth.
You Must Know
-
Don't skip the chilling steps. They are crucial for the right texture and easy dipping.
-
Use a fork or a dipping tool to lower the balls into the chocolate for a cleaner finish.
-
Store them in a single layer in the fridge so they don't stick together.
Frequently Asked Questions
→ Can I use a different type of cookie?
Absolutely. Other sandwich cookies like mint Oreos or golden Oreos work wonderfully. Just make sure they have a creamy filling to help bind the mixture.
→ How far in advance can I make these?
They keep beautifully in an airtight container in the refrigerator for up to a week, making them perfect for getting a head start on your meal prep, leaving you time for something more involved.
→ My mixture is too sticky to roll. What do I do?
No worries. Just pop the bowl into the refrigerator for 15-20 minutes. The cream cheese will firm up, making it much easier to handle.
→ Can I freeze Oreo truffles?
Yes, they freeze very well! Place them in a single layer on a parchment-lined tray until solid, then transfer to a freezer bag. They'll keep for up to 3 months. Thaw in the fridge before serving.
→ What's the best way to melt the chocolate?
I prefer the microwave method for its simplicity. Use a deep bowl, and melt in 30-second intervals at 50% power, stirring well each time, until smooth.
→ Can I make these without cream cheese?
The cream cheese is essential for the classic texture and flavor. For a dairy-free version, you could experiment with a thick, plain vegan cream cheese alternative, but the results may vary slightly.
Nutrition Facts
per serving
120
Calories
1g
Protein
14g
Carbs
7g
Fat
Taste Profile
Decadently sweet and rich with a deep chocolate flavor balanced by a subtle tang from the cream cheese.
Ingredient Substitutions
Don't have an ingredient? Try these alternatives
Chop the chocolate finely and add a teaspoon of coconut oil to help it melt smoothly.
Ensure it's a thick, firm variety for the best binding results in this simple family cooking favorite.
Recipe Variations
Try these delicious twists on the original
Mint Chocolate Truffles
Use mint Oreo cookies and dip them in dark chocolate for a refreshing twist.
Peanut Butter Truffles
Replace the cream cheese with an equal amount of creamy peanut butter for a nutty, rich variation.
White Chocolate Truffles
Use golden Oreos and dip them in white chocolate for a beautiful, blonde look.
Common Mistakes to Avoid
Learn from others' mistakes for perfect results
- Not chilling the mixture before rolling, resulting in sticky hands and misshapen truffles.
- Overheating the chocolate, causing it to become thick and grainy.
- Trying to dip truffles that aren't cold enough, which can cause them to fall apart.
Meal Prep & Storage
Make Ahead Tips
You can make the truffle balls up to 2 days in advance and store them covered in the fridge. Dip them in chocolate the day you plan to serve them for the freshest coating.
Leftover Ideas
Leftover truffles should be stored in the refrigerator. They might soften slightly if left out for long periods, but they will still be delicious.
Perfect Pairings
Serve this with...
Cooking Timeline
Crush Oreos and mix with softened cream cheese.
Chill the mixture, then roll into balls and freeze.
Melt chocolate and dip the frozen truffle balls.
Add toppings and let the chocolate coating set completely in the fridge.
Delicious Oreo Truffles: Easy No-Bake Chocolate Treat
Create irresistible Oreo truffles with this simple, no-bake recipe. Chocolate-covered delights perfect for festive occasions or a sweet treat anytime.
Timing
Prep Time
30 Minutes
Cook Time
0 Minutes
Total Time
1 Hour 30 Minutes (includes chilling)
Recipe Details
Ingredients
For the Truffle Base
-
01
1 package (14.3 oz) Oreo cookies
-
02
8 oz cream cheese, softened to room temperature
For the Coating
-
01
12 oz chocolate melting wafers (dark, milk, or semi-sweet)
-
02
1 teaspoon coconut oil (optional, for thinner coating)
Optional Toppings
-
01
Crushed Oreo crumbs
-
02
Sprinkles
-
03
Flaky sea salt
Instructions
First, place the entire package of Oreo cookies (cream filling and all) into a food processor. Pulse until you have fine, uniform crumbs. You can also place them in a sturdy zip-top bag and crush them with a rolling pin, but the food processor is much easier and gives a better texture.
In a medium mixing bowl, combine the finely crushed Oreo crumbs with the softened cream cheese. Use a spatula or your hands (my preferred method, honestly) to mix until it's fully combined and forms a thick, uniform dough. It will look like a dark, fudgy paste.
Cover the bowl and refrigerate the mixture for about 15-20 minutes. This makes it much easier to handle and roll. Meanwhile, line a baking sheet with parchment paper.
Using a small cookie scoop or a teaspoon, portion out the dough and roll it between your palms to form smooth, 1-inch balls. Place each ball on the prepared baking sheet. Once all are rolled, place the tray in the freezer for at least 30 minutes. This firming-up step is key for a clean dip.
While the balls are chilling, melt your chocolate coating. Place the wafers (and coconut oil, if using) in a deep, microwave-safe bowl. Heat in 30-second intervals at 50% power, stirring thoroughly after each interval, until completely smooth and fluid.
Remove a few truffle balls from the freezer at a time. Using a fork or a dipping tool, submerge each ball in the melted chocolate, tapping gently against the side of the bowl to remove excess. Place it back on the parchment-lined tray.
If you're adding sprinkles or other toppings, do it immediately after dipping, before the chocolate sets. Once all truffles are coated, refrigerate the tray for at least 15-20 minutes, or until the chocolate is fully set and firm.
Once set, transfer the truffles to an airtight container. They are best stored in the refrigerator until you're ready to serve. Enjoy these cool, decadent treats—a perfect sweet finale that's wonderfully simple to make.
Notes & Tips
-
1
For a lighter treat, you can use reduced-fat cream cheese, but the texture might be slightly less rich.
-
2
If the chocolate coating begins to thicken as you work, reheat it for a few seconds in the microwave.
-
3
These truffles make wonderful gifts. Package them in a cute box or cellophane bag.
Tools You'll Need
-
Food processor or zip-top bag and rolling pin
-
Mixing bowls
-
Baking sheet
-
Parchment paper
-
Cookie scoop or teaspoon
-
Microwave-safe bowl
-
Fork or dipping tool
Must-Know Tips
-
Don't skip the chilling, It makes rolling and dipping so much easier.
-
Use a cookie scoop, It ensures all your truffles are the same size and cook evenly.
-
Patience with the chocolate, Melt it slowly to avoid seizing and achieve a smooth finish.
Professional Secrets
-
Room temperature cream cheese, Blends seamlessly with the crumbs for a smooth texture.
-
Freeze before dipping, A cold center prevents the truffle from melting into the warm chocolate.
-
A touch of coconut oil, Thins the chocolate slightly for a more delicate, professional-looking shell.

Recipe by
Lily AndersonLife is sweeter with dessert 🍰💕 Baking joy, spreading smiles, and loving every sprinkle ✨
Get Delicious Recipes Weekly
Join 25,000+ home cooks getting our best recipes straight to their inbox.
Free forever • No spam • Unsubscribe anytime