
Red velvet cake traces its roots to the Victorian era, when bakers used beetroot juice to achieve a striking color. Over time the hue deepened, and cocoa was added for flavor, creating the luxurious crumb we adore today. The mini version captures that heritage while fitting modern cravings for bite‑size indulgence. This recipe honors that tradition without pretension, offering a modest, home‑cooked delight that feels both historic and personal.
Why You'll Love It
-
- Easy to bake in a muffin tin
-
- Moist crumb with a subtle cocoa note
-
- Cream cheese frosting adds tangy richness
-
- Perfect for gifting or a quiet treat
"These minis are a perfect party bite—soft, pretty, and just the right amount of sweet!"
Essential Ingredient Guide
- All‑purpose flour: Provides structure; sift for a lighter texture.
- Cocoa powder: Adds depth of flavor without overpowering the velvet hue.
- Buttermilk: Keeps the cake tender and gives a slight tang that balances the sweetness.
- Cream cheese: Creates a silky frosting that mellows the cake’s richness.
- Red food coloring: A few drops are enough; the natural beet juice can be used for a subtle shade.
- Granulated sugar: Sweetens the batter; consider a cup of fine sugar for a smoother crumb.


Complete Cooking Process
-
Ingredient Readiness:
Measure flour, cocoa, and sugar; whisk together dry components. Soften butter and bring eggs and buttermilk to room temperature.
-
Flavor Development:
Blend butter and sugar until pale, then incorporate eggs one at a time, allowing each to fold in before the next.
-
Texture Control:
Fold in the dry mixture gently; over‑mixing can toughen the crumb.
-
Finishing Touches:
Pipe or dollop cream cheese frosting on each mini while still warm, letting the frosting melt slightly into the surface.
-
Serving Timing:
Let the cakes cool completely before frosting; serve at room temperature for the best melt‑in‑your‑mouth feel.
-
Use a kitchen scale for precise flour measurements.
-
Add a splash of vanilla extract for extra aroma.
-
Cool the tins upside down for 5 minutes to avoid soggy bottoms.
-
Store in an airtight container; they stay moist for up to three days.
Pro Tips
When you pull these minis out of the tin, notice the faint crackle of the frosting as it settles. It’s a quiet reminder that even the simplest desserts carry a story. Take a moment, breathe in that cocoa‑kissed scent, and share them with someone you love – the joy is in the giving as much as the tasting.
The essence of the dish:
A tender, ruby‑red crumb balanced by a tangy cream cheese frosting, each bite offering a whisper of cocoa and a melt‑in‑your‑mouth softness.
A fun fact or historical angle:
The original red velvet cake was once a “poor man’s” chocolate cake, using cheap cocoa and beet juice for color.
Flavor or sensory focus:
You’ll first taste the buttery sweetness, then the subtle cocoa undertone, followed by the bright, creamy tang of the frosting.
You Must Know
-
Do not over‑mix the batter.
-
Cool the tin before frosting.
-
Use room‑temperature butter for even creaming.
Frequently Asked Questions
→ Can I make these gluten‑free?
Yes – swap the all‑purpose flour for a gluten‑free blend and the result stays tender.
→ How long do they keep?
Store in an airtight container at room temperature for up to three days, or freeze for a month.
→ Can I add chocolate chips?
A quarter cup of mini chips folded into the batter adds a pleasant surprise.
→ Do I need a special pan?
Standard 12‑cup mini muffin tins work perfectly; greasing lightly helps release.
→ What frosting works best?
A classic cream cheese frosting made with butter, cream cheese, powdered sugar, and vanilla.
→ Can I freeze them?
Absolutely – cool completely, wrap individually, and freeze; thaw before serving.
Nutrition Facts
per serving
180
Calories
3g
Protein
22g
Carbs
9g
Fat
Taste Profile
A balanced sweet cake with a tangy frosting finish
Ingredient Substitutions
Don't have an ingredient? Try these alternatives
Ensure the blend contains xanthan gum for structure.
Use a brand that melts well; you may need a touch more sugar.
Recipe Variations
Try these delicious twists on the original
Spicy Version
Add a pinch of cayenne and a drizzle of honey‑sriracha glaze for a gentle kick.
Mediterranean Style
Stir in chopped pistachios and a hint of orange zest into the frosting.
Common Mistakes to Avoid
Learn from others' mistakes for perfect results
- Over‑mixing the batter, leading to a dense crumb.
- Filling tins too high, causing overflow.
- Skipping the cooling step before frosting, which makes frosting slide off.
Meal Prep & Storage
Make Ahead Tips
You can bake the minis up to 2 days ahead and store them un‑frosted; frost just before serving for maximum freshness.
Leftover Ideas
Enjoy a leftover mini as a quick snack; a brief warm‑up in the microwave revives the softness.
Perfect Pairings
Serve this with...
Cooking Timeline
Gather and measure all dry ingredients; preheat oven.
Cream butter and sugar, add eggs, then blend in wet ingredients.
Fold in dry mixture gently; spoon batter into tins.
Bake, cool, then frost each mini cake.
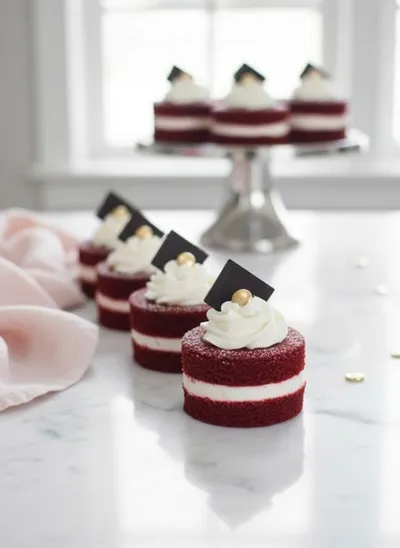
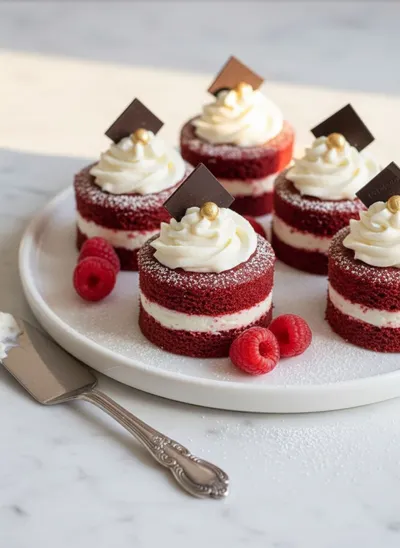
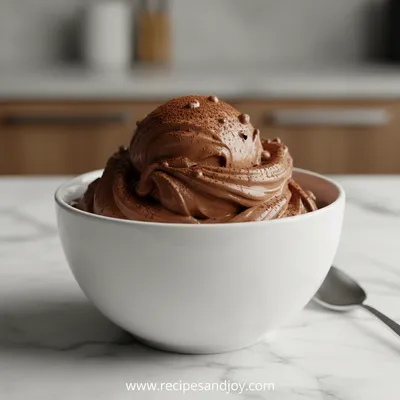
Red Velvet Cake Minis
Delight in bite‑size red velvet cake minis that are moist, tender, and topped with a silky cream cheese frosting—perfect for a sweet treat any time of day.
Timing
Prep Time
20 Minutes
Cook Time
15 Minutes
Total Time
35 Minutes
Recipe Details
Ingredients
Cake
-
01
1 ½ cups all‑purpose flour
-
02
¼ cup unsweetened cocoa powder
-
03
1 tsp baking soda
-
04
½ tsp salt
-
05
½ cup unsalted butter, softened
-
06
1 cup granulated sugar
-
07
2 large eggs, room temperature
-
08
¼ cup buttermilk
-
09
2 tbsp red food coloring
-
10
1 tsp vanilla extract
Frosting
-
01
4 oz cream cheese, softened
-
02
¼ cup unsalted butter, softened
-
03
1 cup powdered sugar, sifted
-
04
½ tsp vanilla extract
Instructions
Preheat the oven to 350°F (175°C) and line a 12‑cup mini muffin tin with paper liners.
In a bowl whisk together flour, cocoa, baking soda, and salt; set aside.
Beat butter and sugar until light and fluffy, about 3 minutes; add eggs one at a time, mixing well after each.
Stir in vanilla, food coloring, and buttermilk; gently fold in the dry ingredients until just combined.
Spoon batter into the prepared tins, filling each about ¾ full; bake 12‑15 minutes until a toothpick comes out clean.
Allow the minis to cool in the tin for 5 minutes, then transfer to a wire rack.
While the cakes cool, beat cream cheese, butter, powdered sugar, and vanilla until smooth and creamy.
Pipe or spread a dollop of frosting onto each mini; let them sit for a few minutes to set.
Notes & Tips
-
1
If the batter looks too thick, add a tablespoon of milk.
-
2
For a deeper color, let the colored batter rest 10 minutes before baking.
-
3
Frost while the cakes are still warm for a glossy finish.
Tools You'll Need
-
Mini muffin tin
-
Mixing bowls
-
Electric mixer
-
Spatula
-
Piping bag or small spoon
Must-Know Tips
-
Don’t over‑mix; it can make the cake dense.
-
Room‑temperature butter and eggs create a smoother batter.
-
Taste the frosting and adjust sweetness if needed.
Professional Secrets
-
Sift flour and cocoa for an airy crumb.
-
Use a kitchen scale for consistent results.
-
Cool the tins upside down briefly to prevent soggy bottoms.

Recipe by
Lily AndersonLife is sweeter with dessert 🍰💕 Baking joy, spreading smiles, and loving every sprinkle ✨
Get Delicious Recipes Weekly
Join 25,000+ home cooks getting our best recipes straight to their inbox.
Free forever • No spam • Unsubscribe anytime