
Red velvet cake traces its roots back to the Victorian era, where the reaction between natural cocoa powder and acidic ingredients created a subtle red hue and velvety texture. The addition of cream cheese frosting became iconic in the 20th century, particularly in Southern United States where these cakes were considered special occasion desserts. Combining these elements with brownie batter creates a modern dessert that honors tradition while offering something uniquely indulgent.
Why You'll Love It
-
The perfect marriage of fudgy brownie and creamy cheesecake textures
-
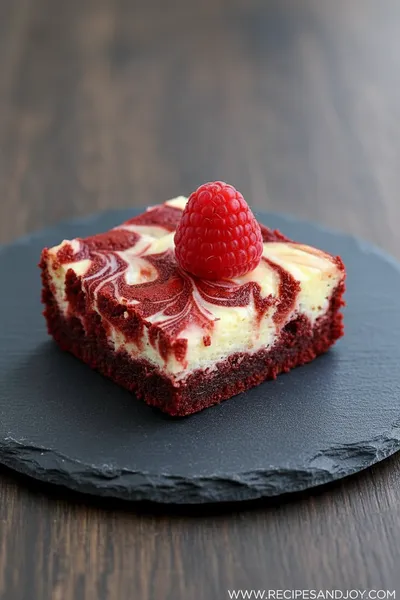
Stunning visual appeal with those beautiful red and white swirls
-
Surprisingly simple to make despite looking bakery-worthy
-
Freezes beautifully for make-ahead dessert planning
"I've made these three times this month - they disappear faster than any dessert I've ever baked!"
Essential Ingredient Guide
- Cocoa powder: Use natural cocoa powder (not Dutch-processed) as the acidity helps activate the red color reaction with the vinegar
- Cream cheese: Bring to room temperature for smooth swirling - cold cream cheese will create lumps and make swirling difficult
- Red food coloring: Gel food coloring gives the most vibrant results without affecting the batter's consistency
- Butter: Unsalted butter allows you to control the salt level perfectly in both the brownie and cheesecake components
- White vinegar: Just a teaspoon enhances the red color reaction and adds subtle tang that balances the sweetness
- Sugar: A combination of granulated and brown sugar creates depth - the brown sugar adds moisture and caramel notes

Complete Cooking Process
-
Ingredient Readiness:
All ingredients should be at room temperature before beginning. This ensures even mixing and proper emulsification, especially important for the cream cheese component to achieve that silky smooth texture.
-
Flavor Development:
The flavors deepen during baking as the cocoa mellows and the cream cheese subtly tangy notes balance the sweetness. The brief resting period after baking allows these flavors to harmonize completely.
-
Texture Control:
Removing the brownies at the right moment - when the center still has a slight jiggle - ensures fudgy rather than cakey results. Cooling completely before cutting prevents tearing and creates clean slices.
-
Finishing Touches:
A dusting of powdered sugar or cocoa powder right before serving adds visual appeal and a hint of extra sweetness that complements the rich flavors beautifully.
-
Serving Timing:
These brownies taste best at room temperature when the textures have settled. They're ideal for serving about 2-3 hours after baking, though chilling them briefly makes for cleaner slicing.
-
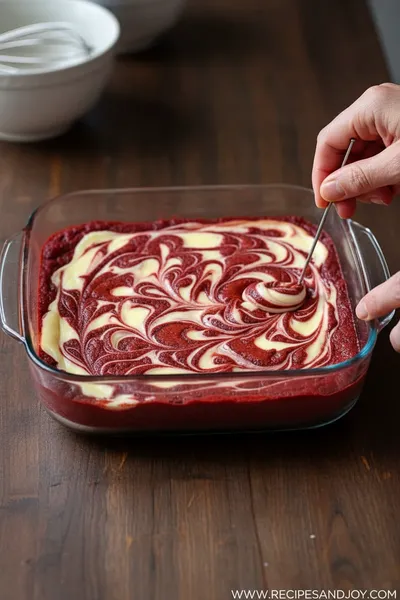
Use a toothpick or knife to create swirls - don't overmix or you'll lose the distinct layers
-
Line your pan with parchment paper with overhanging edges for easy removal and clean slicing
-
For extra fudgy results, slightly underbake by 2-3 minutes - the center should still have a slight jiggle
-
Chill the brownies for 30 minutes before cutting for perfectly clean edges
Pro Tips
You know, I've found that making these feels almost therapeutic. There's something about watching that red batter spread across the pan, then dolloping the white cheesecake mixture on top. The swirling motion is so gentle, like you're creating edible art. And the waiting... oh, the waiting is the hardest part. That warm kitchen scent of chocolate and vanilla just wraps around you like a hug.
Honestly, the first time I made these, I worried I'd messed up the swirls. They looked kind of messy, not like those perfect pictures you see. But when they came out of the oven? Wow. The marbling had settled into this beautiful pattern that looked professionally done. Sometimes imperfections create the most beautiful results, you know?
The Essence of the Dish
What makes these special is how they capture the soul of both desserts - the rich, almost earthy chocolate depth of red velvet combined with the bright, tangy creaminess of cheesecake. They're not just brownies with a swirl; they're a conversation between two classic American desserts.
A Fun Historical Angle
The red velvet cake's popularity surged during World War II when bakers used beet juice to enhance color during rationing. While we use food coloring today, that resourceful spirit lives on in this modern mashup.
Flavor Focus
Your first bite will surprise you - there's the immediate chocolate richness, then that subtle tang from the cream cheese cuts through, preventing it from being overly sweet. The texture contrast between fudgy brownie and smooth cheesecake is what keeps you coming back for just one more small piece.
You Must Know
-
Don't skip the vinegar - it's essential for both the color reaction and flavor balance
-
Room temperature ingredients are non-negotiable for smooth swirling
-
Undermixing the swirls is better than overmixing - gentle folds create the best pattern
-
Let them cool completely before cutting for clean, beautiful slices
Frequently Asked Questions
→ Can I make these without red food coloring?
Absolutely! They'll taste the same but will have a deeper brown chocolate color. You could try using beet powder for natural coloring, though the result will be more subtle.
→ My cream cheese mixture is lumpy - what did I do wrong?
This usually happens when the cream cheese isn't fully room temperature. Next time, let it soften completely, and make sure your other ingredients are room temp too. For now, try pressing the mixture through a fine mesh strainer.
→ How do I know when they're done baking?
The edges should be set and pulling away from the pan slightly, but the center should still have a slight jiggle when you gently shake the pan. A toothpick inserted should come out with moist crumbs, not completely clean.
→ Can I freeze these brownies?
Yes! They freeze beautifully for up to 3 months. Wrap tightly in plastic wrap then foil, or place in airtight containers. Thaw at room temperature for several hours before serving.
→ What's the best way to get clean cuts?
Chill them first for about 30 minutes, then use a sharp knife wiped clean between each cut. Some people even dip the knife in hot water before cutting for extra-clean slices.
→ Can I use Dutch-process cocoa instead?
I wouldn't recommend it - Dutch-process cocoa is less acidic, so you won't get the same color reaction or flavor balance. Stick with natural cocoa powder for best results.
Nutrition Facts
per serving
285
Calories
4g
Protein
35g
Carbs
15g
Fat
Taste Profile
Rich chocolate balanced by tangy cream cheese with deep caramel notes
Ingredient Substitutions
Don't have an ingredient? Try these alternatives
Will change texture and flavor slightly - mascarpone creates extra richness
Use refined coconut oil to avoid coconut flavor interfering with the chocolate
1 tablespoon ground flaxseed + 3 tablespoons water per egg, may affect texture
Recipe Variations
Try these delicious twists on the original
White Chocolate Swirl
Add ½ cup melted white chocolate to the cheesecake layer for extra richness and visual contrast
Mint Version
Add ½ teaspoon peppermint extract to the brownie batter and garnish with crushed candy canes
Nutty Addition
Fold ½ cup chopped pecans or walnuts into the brownie batter for added crunch
Common Mistakes to Avoid
Learn from others' mistakes for perfect results
- Using cold ingredients causes lumpy cheesecake layer
- Overbaking results in dry, cakey brownies instead of fudgy
- Overmixing the swirls blends layers instead of creating pattern
- Cutting while warm causes crumbling and messy slices
Meal Prep & Storage
Make Ahead Tips
You can prepare the batter and cheesecake mixture up to a day ahead - store separately in airtight containers in the refrigerator. Bring to room temperature before assembling and baking. Baked brownies freeze beautifully for up to 3 months.
Leftover Ideas
Store leftovers in an airtight container. They're delicious cold from the refrigerator or slightly warmed in the microwave for 10-15 seconds. The texture becomes even fudgier after refrigeration.
Perfect Pairings
Serve this with...
Cooking Timeline
Prep ingredients, line pan, preheat oven
Make cheesecake layer and set aside
Prepare red velvet batter, assemble layers in pan
Create swirl pattern with knife or toothpick
Bake 30-35 minutes, then cool completely
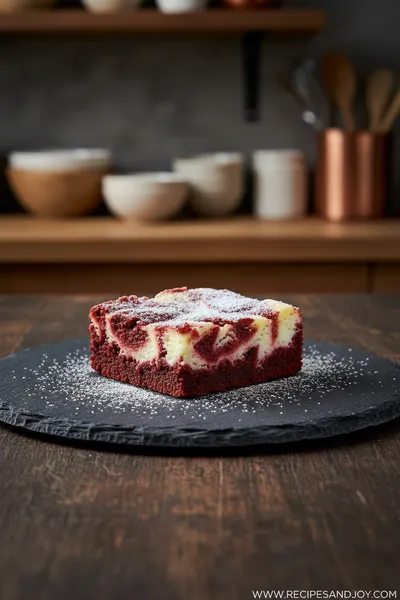
Red Velvet Cheesecake Brownies
These red velvet cheesecake brownies combine rich cocoa flavor, vibrant red coloring, and creamy cheesecake swirls - the ultimate dessert mashup that feels both nostalgic and decadent.
Timing
Prep Time
20 Minutes
Cook Time
35 Minutes
Total Time
55 Minutes
Recipe Details
Ingredients
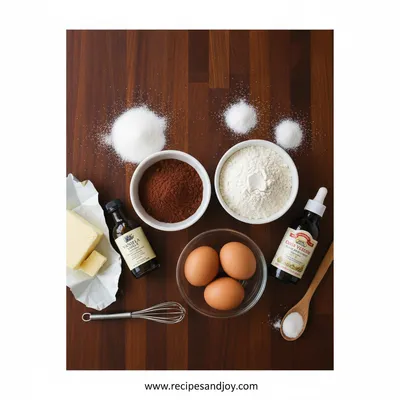
Red Velvet Brownie Layer
-
01
1 cup unsalted butter, melted and slightly cooled
-
02
1 ½ cups granulated sugar
-
03
¾ cup packed brown sugar
-
04
4 large eggs, room temperature
-
05
1 tablespoon vanilla extract
-
06
1 teaspoon white vinegar
-
07
1 ½ cups all-purpose flour
-
08
¾ cup natural cocoa powder
-
09
½ teaspoon salt
-
10
1-2 tablespoons red gel food coloring
Cheesecake Swirl Layer
-
01
8 ounces cream cheese, softened to room temperature
-
02
½ cup granulated sugar
-
03
1 large egg, room temperature
-
04
1 teaspoon vanilla extract
Instructions
Preheat oven to 350°F (175°C). Line an 9x9 inch baking pan with parchment paper, leaving overhang on two sides for easy removal. Lightly grease the parchment.
Make the cheesecake layer: In a medium bowl, beat the softened cream cheese with an electric mixer until smooth and creamy. Add sugar, egg, and vanilla, beating until completely combined and no lumps remain. Set aside.
Make the brownie batter: In a large bowl, whisk together the melted butter, both sugars, eggs, vanilla, and vinegar until well combined. The mixture should be smooth and slightly thickened.
Sift in the flour, cocoa powder, and salt. Gently fold with a spatula until just combined - don't overmix. Add red food coloring and fold until the batter is uniformly colored.
Spread about ⅔ of the red velvet batter into the prepared pan. Dollop the cream cheese mixture evenly over the top. Drop remaining red velvet batter in small spoonfuls over the cream cheese layer.
Using a knife or toothpick, gently swirl the layers together in a figure-8 motion. Don't overmix - you want distinct marbling rather than combined batter.
Bake for 30-35 minutes, until the edges are set and the center still has a slight jiggle. A toothpick inserted should come out with moist crumbs. Cool completely in the pan on a wire rack before cutting.
Notes & Tips
-
1
For the reddest color, use gel food coloring rather than liquid - it's more concentrated and won't thin your batter
-
2
These brownies taste even better the next day as the flavors continue to develop and meld together
-
3
Store in an airtight container at room temperature for up to 3 days, or refrigerate for up to a week
Tools You'll Need
-
9x9 inch baking pan
-
Parchment paper
-
Electric mixer or stand mixer
-
Mixing bowls
-
Whisk
-
Rubber spatula
-
Measuring cups and spoons
-
Toothpick or knife for swirling
Must-Know Tips
-
Bring all ingredients to room temperature - this is crucial for smooth blending and proper swirling
-
Don't overbake! The center should still be slightly jiggly for fudgy results
-
Use the parchment paper overhang to lift the entire brownie slab out for clean, easy cutting
-
Chill before cutting for professional-looking slices that won't tear or crumble
Professional Secrets
-
Sift dry ingredients - removes lumps and creates lighter texture
-
Undermix the batter - overmixing develops gluten and makes brownies tough
-
Cool completely before cutting - allows structure to set for clean edges
-
Rotate pan halfway through baking - ensures even cooking and browning

Recipe by
Lily AndersonLife is sweeter with dessert 🍰💕 Baking joy, spreading smiles, and loving every sprinkle ✨
Get Delicious Recipes Weekly
Join 25,000+ home cooks getting our best recipes straight to their inbox.
Free forever • No spam • Unsubscribe anytime