
The origins of granola trace back to the late 19th century, when health‑focused reformers mixed rolled oats, nuts, and sweeteners to create a portable nourishment. Over time, the no‑bake version emerged as a convenient adaptation for modern kitchens, allowing families to whip up a snack without heating the whole house. This recipe honors that tradition while adding a contemporary touch of honey‑brown sugar drizzle.
Why You'll Love It
-
- No oven needed, perfect for summer kitchens
-
- Customizable with favorite nuts or dried fruit
-
- Sweetened naturally with honey and brown sugar
-
- Holds shape for easy packing
“These bars are my new pantry staple—soft, sweet, and never crumbly!”
Essential Ingredient Guide
- Rolled oats: Choose thick‑cut oats for texture; they toast well and give a hearty bite.
- Mixed nuts: Use a blend of almonds, walnuts, and pecans for crunch and healthy fats.
- Dried fruit: Add raisins or cranberries for a burst of chewiness and natural sweetness.
- Honey: Acts as the binder; a mild honey keeps the flavor balanced.
- Brown sugar: Provides caramel depth; adjust to taste.
- Coconut oil: Melts quickly and adds a subtle richness.
 Sweet Treats & Desserts
Healthier Hot Chocolate Recipe
Learn how to make a delicious healthier hot chocolate that's perfect for a cozy warm beverage.
Complete Cooking Process
-
Ingredient Readiness:
Measure and lightly toast oats and nuts in a dry skillet until golden; this releases their aroma without adding oil.
-
Flavor Development:
Warm honey, brown sugar, and coconut oil together until bubbling; this glossy mixture will coat the dry ingredients.
-
Texture Control:
Combine toasted oats, nuts, and dried fruit with the honey glaze, press firmly into a lined pan.
-
Finishing Touches:
Let the bars set in the refrigerator for at least 30 minutes, then slice into bars.
-
Serving Timing:
Serve chilled or at room temperature; they hold up well for a day or two.
-
Press the mixture tightly with a flat spatula to avoid crumbling.
-
If the mixture feels dry, warm the honey blend a little longer.
-
Add a pinch of sea salt to balance the sweetness.
Pro Tips
When you press the bars, imagine the gentle compression of a soft pillow—yeah, that sensation helps them stay together. Also, you can line the pan with parchment paper; it makes lifting the slab a breeze, and cleanup becomes a quick swipe. Finally, store the bars in an airtight container; they stay fresh and chewy for up to a week.
The essence of the dish:
What makes these bars special is the harmony between toasted oat crunch and the smooth honey binding, creating a texture that’s soft in the middle yet slightly crisp on the edges.
A fun fact or historical angle:
Granola’s original incarnation was a health food for Victorian reformers; the no‑bake version became popular in the 1970s with the rise of backpacking culture.
Flavor or sensory focus:
Expect the warm, nutty scent as you open the pan, the sweet caramel note from brown sugar, and a lingering hint of sea salt that brightens every bite.
You Must Know
-
Bar firmness depends on how tightly you press.
-
Cooling time is essential for proper setting.
-
Store in the fridge for best texture.
Frequently Asked Questions
→ Can I use maple syrup instead of honey?
Yes, maple syrup works well as a binder; it will add a slight earthiness to the flavor.
→ How long can the bars be stored?
Store them in an airtight container in the refrigerator for up to a week; they stay soft and fresh.
→ Are the bars gluten‑free?
Use certified gluten‑free rolled oats and ensure all other ingredients are gluten‑free.
→ Can I add chocolate chips?
Absolutely—mix in a handful of mini chocolate chips after the honey glaze cools slightly.
→ Do I need to toast the oats?
Toasting enhances flavor and texture, but you can skip it if you’re short on time; the bars will be softer.
→ What if the mixture is too dry?
Warm a bit more honey and oil, then stir until the blend becomes pliable.
Nutrition Facts
per serving
210
Calories
5g
Protein
28g
Carbs
9g
Fat
Taste Profile
Warm, nutty sweetness with a hint of caramel
Ingredient Substitutions
Don't have an ingredient? Try these alternatives
Provides similar sweetness with a milder flavor.
Great for nut‑allergy adaptations.
Recipe Variations
Try these delicious twists on the original
Spicy Version
Add ½ tsp cinnamon and a pinch of cayenne pepper for a warm kick.
Mediterranean Style
Mix in chopped dried apricots, pistachios, and a drizzle of orange blossom honey.
Common Mistakes to Avoid
Learn from others' mistakes for perfect results
- Skipping the toasting step, which leaves oats bland.
- Pressing the mixture loosely, causing bars to crumble.
- Not allowing enough cooling time, resulting in soft, sticky bars.
Meal Prep & Storage
Make Ahead Tips
You can prepare the bars up to three days ahead; keep them sealed in the fridge for maximum freshness.
Leftover Ideas
Enjoy leftover bars as a quick breakfast or snack; they taste just as good chilled or at room temperature.
Perfect Pairings
Serve this with...
Cooking Timeline
Toast oats and nuts in a dry skillet until golden.
Combine honey, brown sugar, coconut oil, and salt; heat until bubbling.
Mix dry ingredients with the warm glaze; stir to coat.
Press mixture into lined pan and chill.
Allow bars to set in the refrigerator, then slice and serve.
 Healthy, Simple & Family Cooking
Crispy Keto Onion Rings
A easy, crunchy keto snack that feels indulgent without the carbs.
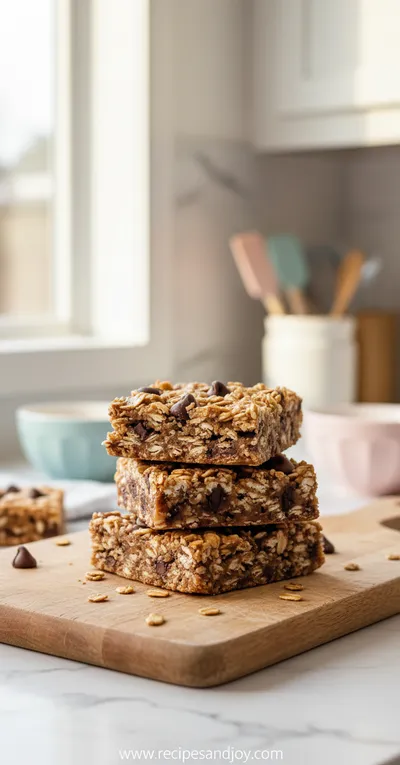
Homemade No Bake Granola Bars
Enjoy these easy homemade no bake granola bars, a quick, healthy snack perfect for any time. The bars combine toasted oats, nuts, and a hint of honey, creating a chewy, satisfying treat that feels like a gentle hug on a busy day.
Timing
Prep Time
15 Minutes
Cook Time
0 Minutes
Total Time
45 Minutes
Recipe Details
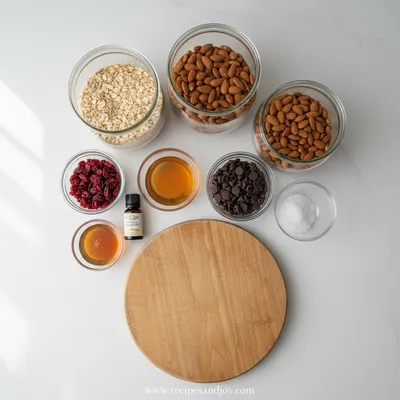
Ingredients
Base
-
01
2 cups rolled oats
-
02
1 cup mixed nuts, roughly chopped
-
03
½ cup dried fruit (raisins, cranberries, or chopped dates)
-
04
¼ cup shredded coconut (optional)
Binding
-
01
⅓ cup honey
-
02
¼ cup brown sugar
-
03
2 tbsp coconut oil
-
04
¼ tsp sea salt
Instructions
In a large skillet over medium heat, toast the rolled oats and mixed nuts, stirring occasionally, until golden and fragrant, about 5‑7 minutes.
Meanwhile, in a small saucepan, combine honey, brown sugar, coconut oil, and sea salt. Heat gently, stirring until the sugar dissolves and the mixture bubbles lightly.
Remove the skillet from heat. Add the toasted oats, nuts, dried fruit, and coconut to the bowl, then pour the warm honey glaze over everything. Stir quickly to coat evenly.
Press the mixture firmly into a 9×13‑inch parchment‑lined pan. Use the back of a spoon or a flat spatula to compact it. Chill in the refrigerator for at least 30 minutes.
After chilling, lift the slab from the pan using the parchment, place on a cutting board, and slice into 12 bars.
Notes & Tips
-
1
If the mixture feels crumbly, warm the honey blend a bit longer before mixing.
-
2
Press the bars tightly; this prevents them from falling apart later.
-
3
Feel free to swap nuts or dried fruit according to personal preference.

Tools You'll Need
-
Large skillet
-
Small saucepan
-
Wooden spoon
-
Spatula
-
9×13‑inch baking pan
-
Parchment paper
Must-Know Tips
-
Don't overcrowd the pan when toasting, stir in batches for even color.
-
Let the honey mixture cool just enough to handle, but not solidify.
-
Taste the binding syrup before adding; adjust sweetness or salt as needed.
Professional Secrets
-
Toast oats and nuts separately for layered flavor.
-
Use low‑heat melt for honey to keep its delicate floral notes.
-
Press the bars while the mixture is still warm for a firmer set.

Recipe by
Lily AndersonLife is sweeter with dessert 🍰💕 Baking joy, spreading smiles, and loving every sprinkle ✨
Get Delicious Recipes Weekly
Join 25,000+ home cooks getting our best recipes straight to their inbox.
Free forever • No spam • Unsubscribe anytime