
Pumpkin has been nourishing families for centuries, originally cultivated by Native Americans who recognized its versatility and nutritional value. The practice of combining pumpkin with grains and natural sweeteners echoes traditional food wisdom, where every ingredient serves both flavor and function. These bars continue that legacy – transforming simple, wholesome components into convenient nourishment. The addition of plant-based protein powder is a modern twist on ancient sustenance, making these bars perfect for today's active lifestyles while honoring pumpkin's rich culinary history.
Why You'll Love These Pumpkin Protein Bars
-
- No baking required – perfect for warm days or busy schedules
-
- Packed with 10g plant-based protein per bar to keep you satisfied
-
- Natural sweetness from dates and maple syrup – no refined sugars
-
- The warm pumpkin spice flavor feels like autumn in every bite
"These bars saved my hectic mornings! My kids actually ask for them instead of sugary snacks." – Sarah, busy mom of three
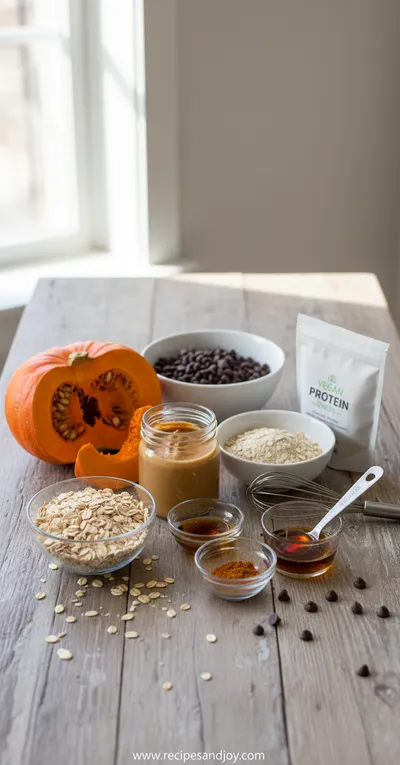
Essential Ingredient Guide
- Pumpkin puree: Use canned pure pumpkin (not pie filling) for consistent texture and flavor. The natural moisture helps bind the bars without baking
- Vanilla plant-based protein powder: Choose a quality vegan protein that mixes well. This adds structure and nutritional boost while complementing the pumpkin flavor
- Medjool dates: These natural sweeteners provide caramel-like richness and help bind the mixture. Soak them if they're dry for easier blending
- Pumpkin pie spice: The warm blend of cinnamon, ginger, nutmeg and cloves enhances the pumpkin flavor beautifully. Fresh spices make a noticeable difference
- Maple syrup: Adds liquid sweetness and helps achieve the perfect bar consistency. Grade A amber has the best flavor balance
Complete Cooking Process
-
Ingredient Readiness:
All ingredients should be at room temperature for ideal blending. Soften dates if needed by soaking in warm water for 10 minutes, then drain thoroughly. Measure the pumpkin puree after stirring it well if separated in the can.
-
Flavor Development:
The flavors deepen as the bars chill. The pumpkin spice melds with the sweetness during the resting period, creating a more complex taste profile that improves over 24 hours.
-
Texture Control:
Proper pressing into the pan is crucial for firm bars. Use the back of a measuring cup to press firmly and evenly, ensuring no air pockets remain that could cause crumbling.
-
Finishing Touches:
The final chill sets the structure. Don't rush this step – bars need at least 2 hours to firm up properly for clean cutting. Warming your knife under hot water before slicing helps create neat edges.
-
Serving Timing:
These bars are best served chilled straight from the refrigerator. The cool temperature enhances the firm texture and makes the flavors pop, perfect for a refreshing yet satisfying snack.
-
Line your pan with parchment paper leaving overhang – makes removal so much easier
-
Toast your oats lightly before blending for a nuttier flavor dimension
-
If mixture seems too wet, add more protein powder 1 tablespoon at a time
-
For cleaner cuts, chill bars completely then use a sharp knife warmed under hot water
Pro Tips
I remember making these for the first time and being surprised how sturdy they became after chilling. The trick is really in the pressing – you want to compact the mixture firmly so it holds together. Don't be gentle here! Use your body weight if needed to press it down evenly.
Another thing I've learned over time is that the bars taste even better the next day. Something about the flavors marrying overnight makes the pumpkin spice more pronounced and the texture becomes perfect. If you can wait, try making them a day ahead – though honestly, they rarely last that long in my house!
 Healthy, Simple & Family Cooking
Crispy Keto Onion Rings
A easy, crunchy keto snack that feels indulgent without the carbs.
The Essence of These Bars
What makes these bars special is how they capture the cozy feeling of autumn in a convenient, nutritious form. The combination of warm pumpkin spices with the natural sweetness creates something that feels indulgent yet is genuinely good for you. They're the perfect bridge between health-conscious eating and comfort food cravings.
A Pumpkin History Moment
Pumpkins originated in Central America over 7,500 years ago and were among the first foods explorers brought back to Europe. Native American tribes traditionally roasted pumpkin strips over fires and created nutritious mixtures similar in spirit to these modern protein bars.
The Sensory Experience
When you bite into these bars, you'll first notice the firm yet yielding texture, then the warm pumpkin spice aroma fills your senses. The sweetness is gentle and natural, followed by the satisfying substance that comes from the oats and protein. It's a wholesome experience that leaves you feeling energized rather than weighed down.
You Must Know
Frequently Asked Questions
→ Can I use fresh pumpkin instead of canned?
Absolutely! Roast and puree your own pumpkin – just make sure it's thick and not watery. Spread the puree on a towel to remove excess moisture before using.
→ My mixture seems too dry – what should I do?
Add more maple syrup one tablespoon at a time until it holds together when pressed. The consistency should be like damp sand that clumps firmly.
→ How long do these bars last?
They keep well in the refrigerator for up to 10 days, or freeze for 3 months. I often make a double batch for freezing – they thaw perfectly.
→ Can I make these without protein powder?
Yes, but you'll need to add more oats or nut flour to maintain the structure. The bars will be softer but still delicious.
→ What's the best way to store them?
Layer between parchment paper in an airtight container. This prevents sticking and keeps them fresh. They're great for lunchboxes too!
→ Can I add chocolate chips or nuts?
Definitely! Stir in up to ½ cup of mini chocolate chips or chopped nuts after blending. They add nice texture contrasts.
Nutrition Facts
per serving
185
Calories
10g
Protein
28g
Carbs
4g
Fat
Taste Profile
Warm pumpkin spice balanced with natural sweetness and subtle protein notes
Ingredient Substitutions
Don't have an ingredient? Try these alternatives
Soak first to soften, may need slightly less maple syrup
Coconut flour absorbs more moisture – start with ¼ cup
Honey isn't vegan but works well if that's not a concern
Recipe Variations
Try these delicious twists on the original
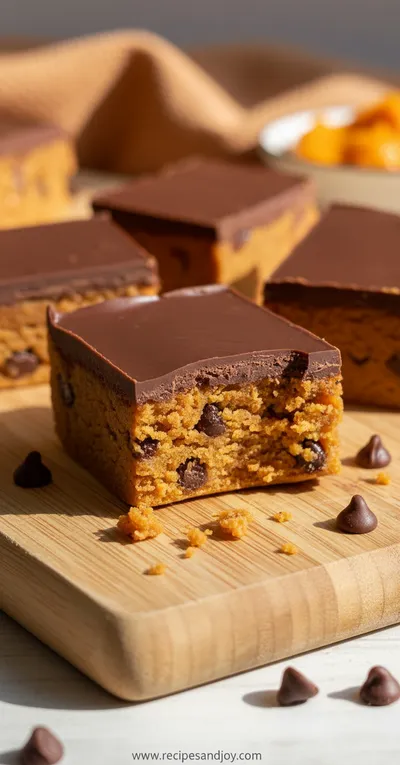
Chocolate Pumpkin Version
Add ¼ cup cocoa powder and use chocolate protein powder for a decadent twist
Nut-Free Adaptation
Replace almond flour with sunflower seed flour and omit pumpkin seed topping
Extra Spice Version
Double the pumpkin pie spice and add pinch of cayenne for warm heat
Common Mistakes to Avoid
Learn from others' mistakes for perfect results
- Not pressing mixture firmly enough – leads to crumbly bars
- Skipping the chilling time – bars need this to set properly
- Using pumpkin pie filling instead of puree – adds unwanted sugars and spices
- Over-processing the oats – they should retain some texture
Meal Prep & Storage
Make Ahead Tips
These bars are perfect for make-ahead preparation. They actually improve in texture and flavor after 24 hours in the refrigerator. You can prepare them up to 10 days in advance, making them ideal for weekly meal planning alongside other prepared items.
Leftover Ideas
Leftover bars maintain their texture well for up to 10 days refrigerated. If they soften slightly, simply re-chill before serving. They're wonderful crumbled over yogurt or oatmeal for added nutrition and flavor.
Perfect Pairings
Serve this with...
Cooking Timeline
Prepare pan with parchment paper and gather all ingredients
Process dates, pumpkin, maple syrup and vanilla until smooth
Add dry ingredients and process until dough forms
Press mixture firmly into pan, add toppings if using
Chill until firm – minimum 2 hours, overnight is ideal
Remove from pan, cut into bars, and store properly

Vegan Pumpkin Protein Bars: No Bake Recipe
Healthy vegan pumpkin protein bars that require no baking – packed with autumn flavors and plant-based protein for the perfect snack.
Timing
Prep Time
15 Minutes
Cook Time
0 Minutes
Total Time
2 Hours 15 Minutes
Recipe Details
Ingredients
Main Ingredients
-
01
1 cup pumpkin puree (not pie filling)
-
02
1 cup Medjool dates, pitted
-
03
½ cup maple syrup
-
04
1 cup vanilla plant-based protein powder
-
05
2 cups rolled oats (gluten-free if needed)
-
06
½ cup almond flour
Flavor Enhancers
-
01
2 teaspoons pumpkin pie spice
-
02
1 teaspoon vanilla extract
-
03
½ teaspoon sea salt
-
04
2 tablespoons chia seeds
-
05
¼ cup pumpkin seeds for topping (optional)
Instructions
Line an 8x8 inch baking pan with parchment paper, leaving overhang on two sides for easy removal. Set aside.
In a food processor, combine dates, pumpkin puree, maple syrup, and vanilla extract. Process until smooth and well combined, scraping down sides as needed.
Add protein powder, almond flour, oats, pumpkin pie spice, and sea salt. Process until mixture comes together into a thick, uniform dough that holds together when pressed.
Transfer mixture to prepared pan. Using wet hands or the back of a measuring cup, press firmly and evenly into the pan, ensuring no air pockets remain.
Sprinkle pumpkin seeds evenly over the top if using, pressing lightly to adhere. Cover and refrigerate for at least 2 hours, or until firm.
Lift bars out using parchment overhang. Place on cutting board and slice into 12 bars using a sharp knife. For clean cuts, warm knife under hot water and wipe dry between slices.
Store bars in an airtight container in refrigerator for up to 10 days, or freeze for longer storage. They're perfect for meal planning alongside other prepared foods.
Notes & Tips
-
1
Bars firm up significantly during chilling – don't skip this step
-
2
For gluten-free version, ensure your oats are certified gluten-free
-
3
If mixture seems too wet, add more protein powder 1 tablespoon at a time
-
4
These travel well and make excellent snacks for hikes or road trips
Tools You'll Need
-
Food processor
-
8x8 inch baking pan
-
Parchment paper
-
Measuring cups and spoons
-
Spatula
-
Sharp knife for cutting
Must-Know Tips
-
Press mixture firmly into pan – this is key to bars holding together
-
Chill completely before cutting – patience gives you perfect bars
-
Use quality protein powder – cheaper varieties can have gritty texture
-
Customize spices to your taste – add extra cinnamon or nutmeg if desired
Professional Secrets
-
Toast oats lightly before using – enhances nutty flavor
-
Soak dates if they're dry – ensures smooth blending
-
Chill mixture 15 minutes before pressing – makes handling easier
-
Cut with warm knife – creates clean, professional-looking bars

Recipe by
Lily AndersonLife is sweeter with dessert 🍰💕 Baking joy, spreading smiles, and loving every sprinkle ✨
Get Delicious Recipes Weekly
Join 25,000+ home cooks getting our best recipes straight to their inbox.
Free forever • No spam • Unsubscribe anytime