
I learned this recipe from my Nonna, though she never actually wrote it down. She'd just hum to herself while her hands worked, spreading the ricotta mixture with this gentle, practiced motion that I've spent years trying to replicate. Her kitchen always smelled like Sunday, no matter what day it was - tomatoes simmering, herbs drying above the stove, that warm bread-y scent that lingers in the air.
When I make these now, I can't help but think of her telling me, 'Every roll should be like tucking a child into bed - snug but not too tight.' She'd wink and pat my cheek, flour dusting both our faces. The memory makes me smile every time I lay out those boiled noodles on my countertop.
What I love about this version is how forgiving it is. Sometimes I'll add extra spinach when I'm feeling virtuous, or swap in different cheeses when that's what I have on hand. It's one of those recipes that welcomes your personality, your mood, your pantry. And honestly? The leftovers are even better - the flavors just melt together overnight.
When I'm not rolling lasagna, I often turn to my trusty slow cooker for other comforting meals like this hearty chicken stew that simmers all afternoon, filling the house with anticipation. But there's something special about the hands-on process of making these roll ups that feels like real cooking, you know?
Why You'll Love It
-
They're easier than traditional lasagna - Honestly, the rolling might look fancy but it's actually way simpler than trying to layer everything perfectly in a pan. No worrying about structural integrity or uneven distribution - each roll gets its perfect share of filling. Plus, they cook more evenly this way.
Perfect for portion control - This is so helpful when you're feeding different appetites or want to freeze individual servings. I love being able to make exactly what we need, and the kids think their own personal 'pasta present' is the coolest thing ever.
They freeze beautifully - I always make extra to stash in the freezer for those nights when cooking feels impossible. Just pop them straight from frozen into the oven, add 15 minutes to the baking time, and dinner is saved.
Great for entertaining - They look so elegant lined up in the baking dish, all golden and bubbly. I feel like I've created something restaurant-worthy with minimal effort, which is my favorite kind of kitchen magic.
My family now requests these every Friday night - they're so much fun to eat and leave everyone happily full. The kids love unrolling them on their plates!
Essential Ingredient Guide
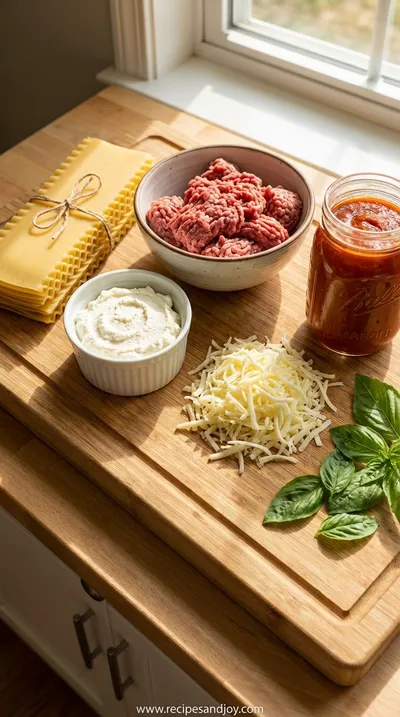
- Lasagna noodles: Use the regular, no-boil ones if you can find them - they hold their shape beautifully and make the process so much simpler. I've tried both fresh and dried, and honestly, the no-boil are my favorite for this application because they're sturdier for rolling.
- Ricotta cheese: Look for whole milk ricotta if possible - it has this lovely creaminess that makes the filling extra luxurious. I always drain mine in a fine mesh sieve for about 15 minutes to get rid of excess moisture, which helps prevent watery roll ups.
- Ground lamb: Since we're not using pork, ground lamb adds this wonderful richness that pairs beautifully with the tomato sauce. Brown it well - I mean, really get some good color on it - because that deep flavor makes all the difference in the final dish.
- Mozzarella cheese: Freshly shredded is worth the extra effort here - the pre-shredded stuff has anti-caking agents that can make the texture a bit grainy. I love watching the cheese bubble and brown on top, creating that perfect golden crust we all crave.

Complete Cooking Process
-
Preparation:
Start by bringing a large pot of salted water to boil - I always add a generous pinch of salt because the pasta will absorb that seasoning. While waiting, I prep my filling ingredients, enjoying the rhythm of chopping herbs and measuring cheeses. It's these quiet moments that make cooking feel like meditation.
When the water's ready, carefully slide in the lasagna noodles one by one, making sure they don't stick together. I like to stir gently with a wooden spoon, watching them soften and curl in the bubbling water. This part always reminds me of my grandmother's kitchen, the steam fogging up the windows.
-
Making the Filling:
While the noodles cook, I start on the lamb sauce, browning the meat until it's nicely caramelized. The smell of garlic and onions sizzling takes me right back to childhood Sundays. For another quick dinner option that's equally satisfying, try this skillet chicken recipe with mushrooms.
Next comes the ricotta mixture - I combine it with egg, Parmesan, and herbs, stirring until everything is beautifully incorporated. The texture should be spreadable but not too loose. I always taste it and adjust the seasoning, because this is where the magic really happens.
-
Assembly:
Lay the cooked noodles flat on a clean kitchen towel - the towel helps absorb excess water so your rolls don't get soggy. Spread each noodle with the ricotta mixture, leaving about an inch at the ends. I use an offset spatula for this, enjoying the smooth motion of spreading.
Roll them up snugly but not too tight - think of swaddling a baby rather than rolling a sleeping bag. Place them seam-side down in your baking dish, and honestly, seeing them all lined up ready for sauce is one of my favorite parts of the process.
-
Don't overcook the noodles - They should be al dente since they'll cook more in the oven. Mushy noodles tear easily and make rolling frustrating.
-
Let the noodles cool slightly - Hot noodles are harder to handle and can burn your fingers. A few minutes of cooling makes them much more manageable.
-
Use a light hand with filling - Too much filling makes rolling difficult and can cause bursting during baking. About ¼ cup per noodle is perfect.
Pro Tips
These little tips have saved me so many times over the years. The first time I made these, I ended up with filling everywhere because I got too enthusiastic with my spreading. Now I know better!
 Sweet Treats & Desserts
No-Bake Protein Energy Balls – Easy Healthy Snack
A simple, no‑bake bite of protein‑packed goodness you can carry anywhere.
Sauce Secrets
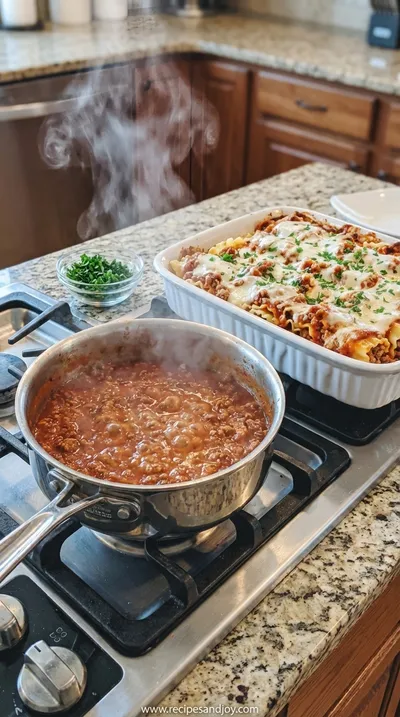
The sauce for these roll ups is what brings everything together. I like to simmer mine for at least 30 minutes to let the flavors really develop. There's something magical about how tomato sauce transforms from bright and acidic to rich and sweet with just a little time and patience.
I always add a pinch of sugar to balance the acidity - not enough to make it sweet, just enough to round out the sharp edges. And fresh basil torn at the very end? That's non-negotiable in my book.
If you're looking for other saucy comfort foods, this chicken pot pie has the most incredible creamy filling that's perfect for chilly evenings.
You Must Know
-
The noodles will continue to absorb sauce as they bake, so don't worry if it seems a bit saucy going into the oven
-
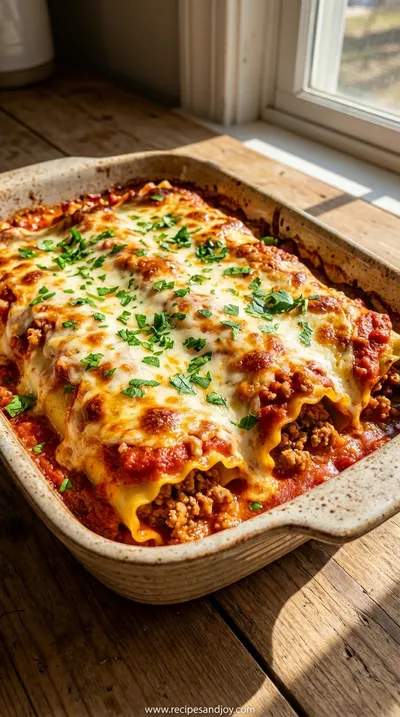
Let the baked roll ups rest for 10 minutes before serving - this helps them set up and makes serving much cleaner
-
You can assemble these up to a day ahead and refrigerate until baking time - perfect for stress-free entertaining
Frequently Asked Questions
→ Can I make these ahead of time?
Absolutely! In fact, they're even better when made ahead. You can assemble them completely, cover tightly with plastic wrap, and refrigerate for up to 24 hours before baking. Just add about 10-15 minutes to the baking time since they'll be going in cold. I often make a double batch on Sunday to have ready for busy weeknights.
→ What's the best way to freeze lasagna roll ups?
Freeze them individually on a baking sheet until solid, then transfer to freezer bags. This way they won't stick together and you can take out exactly how many you need. To cook from frozen, bake covered at 375°F for about 45-50 minutes, then uncover for the last 10 minutes to brown the cheese.
→ Can I use different fillings?
Definitely! This recipe is wonderfully adaptable. I've made spinach and mushroom versions, and even a three-cheese version for vegetarian friends. The key is keeping the filling consistency similar to the ricotta mixture - not too wet, not too dry. If you're experimenting with other proteins, this orange chicken has taught me a lot about balancing flavors.
→ Why do my rolls keep unrolling during baking?
This usually happens if the noodles are too wet or if you've overfilled them. Make sure to pat the noodles dry thoroughly after boiling, and don't spread the filling all the way to the edges. Leaving about an inch at each end gives the noodle something to grip as it bakes.
→ Can I use no-boil lasagna noodles?
Yes, and they actually work beautifully! No-boil noodles are sturdier and hold their shape well for rolling. You'll need to adjust the sauce amount slightly - add about ¼ cup more liquid to the baking dish since the noodles will absorb more moisture as they cook.
→ What's the best cheese combination?
I love the classic ricotta-Parmesan-mozzarella trio, but sometimes I'll mix in some fontina for extra creaminess or asiago for more sharpness. The important thing is having one creamy cheese (like ricotta), one flavorful cheese (like Parmesan), and one melty cheese (like mozzarella). For other cheesy inspiration, this ranch chicken has a fantastic creamy sauce.
→ How do I prevent the bottom from burning?
Make sure you have enough sauce in the bottom of your baking dish - it should coat the bottom generously. If you're worried, you can place the dish on a baking sheet to diffuse the heat. Also, using a ceramic or glass baking dish rather than metal can help prevent hot spots.
→ Can I make these without meat?
Absolutely! Just increase the cheese filling by about 50% and consider adding sautéed mushrooms or spinach for substance. I've made a version with roasted vegetables that was absolutely delicious. The beauty of this recipe is how adaptable it is to different dietary needs.
Nutrition Facts
per serving
420
Calories
28g
Protein
35g
Carbs
18g
Fat
Taste Profile
Rich, savory, and comforting with bright tomato notes
Ingredient Substitutions
Don't have an ingredient? Try these alternatives
Adjust seasoning to complement the different protein - turkey may need more herbs, beef more garlic
Blend in food processor first for smoother texture similar to ricotta
Cook according to package directions - some may require different cooking times
Recipe Variations
Try these delicious twists on the original
Vegetarian Version
Replace lamb with sautéed mushrooms and spinach, increase cheese filling by 50%
Four Cheese
Use ricotta, mozzarella, fontina, and Parmesan with white sauce instead of tomato
Mediterranean Style
Add chopped sun-dried tomatoes, kalamata olives, and feta to the filling
Common Mistakes to Avoid
Learn from others' mistakes for perfect results
- Overcooking noodles before assembly leads to mushy final texture
- Not drying noodles properly causes watery sauce and difficult rolling
- Overfilling the rolls makes them burst open during baking
- Skipping the resting time results in messy serving
Meal Prep & Storage
Make Ahead Tips
You can assemble these completely up to 24 hours ahead - just cover tightly with plastic wrap and refrigerate until ready to bake. Add about 10-15 minutes to baking time if going straight from refrigerator to oven. The filling can be made up to 2 days in advance and stored separately in an airtight container. The sauce can be made up to 3 days ahead or frozen for up to 3 months. For maximum efficiency, I often prep all components on Sunday afternoon so weekday dinners come together in minutes.
Leftover Ideas
Leftovers reheat beautifully - the flavors actually improve overnight. Store in an airtight container and reheat gently in the oven at 350°F for about 15 minutes. You can also chop leftovers and mix with extra sauce for a delicious pasta bake, or even use them as filling for calzones or stuffed bread. For another great leftover idea, try this coconut lime chicken which transforms beautifully into next-day tacos or rice bowls.
Perfect Pairings
Serve this with...
Cooking Timeline
Preheat oven, boil water, prep ingredients
Cook noodles, make meat sauce
Prepare cheese filling, assemble roll ups
Bake covered for 25 min, uncovered for 10 min
Rest before serving
 Sweet Treats & Desserts
Healthier Hot Chocolate Recipe
Learn how to make a delicious healthier hot chocolate that's perfect for a cozy warm beverage.
Lasagna Roll Ups Recipe: Easy Everyday Dinner
These lasagna roll ups are perfect for family dinners. Easy to make and delicious.
Timing
Prep Time
30 Minutes
Cook Time
35 Minutes
Total Time
65 Minutes
Recipe Details
Ingredients
For the Roll Ups
-
01
12 lasagna noodles
-
02
1 lb ground lamb
-
03
1 small onion, finely chopped
-
04
3 cloves garlic, minced
-
05
15 oz ricotta cheese
-
06
1 egg, lightly beaten
-
07
1/2 cup grated Parmesan cheese
-
08
1/4 cup chopped fresh basil
-
09
2 cups shredded mozzarella cheese
-
10
Salt and pepper to taste
For the Sauce
-
01
24 oz marinara sauce
-
02
1 tbsp olive oil
-
03
1 tsp dried oregano
-
04
Pinch of sugar
-
05
Salt to taste
Instructions
Preheat your oven to 375°F and bring a large pot of salted water to boil. While waiting, I like to prep all my ingredients - chopping onions, mincing garlic, measuring cheeses. There's something so satisfying about having everything ready before you start cooking. Cook the lasagna noodles according to package directions until al dente, then drain and lay them flat on a clean kitchen towel to cool slightly.
Heat olive oil in a large skillet over medium heat and sauté the onion until translucent, about 5 minutes. Add the garlic and cook for another minute until fragrant. Then add the ground lamb, breaking it up with a wooden spoon as it browns. I love watching the meat transform from pink to beautifully browned, the kitchen filling with that rich, savory aroma that means comfort food is happening.
In a medium bowl, combine the ricotta, egg, Parmesan, basil, salt, and pepper. Mix until well combined - I use a fork to break up any large curds of ricotta. The texture should be smooth but still have some body to it. Taste and adjust seasoning - this is your chance to make sure the filling is perfectly seasoned before it gets wrapped up in those noodles.
Spread about ¾ cup of marinara sauce in the bottom of a 9x13 baking dish. Take each cooked noodle and spread with about ¼ cup of the ricotta mixture, leaving about an inch at each end. Roll up snugly and place seam-side down in the prepared dish. Repeat with remaining noodles - I love seeing them all lined up like little pasta soldiers ready for their sauce bath.
Top the roll ups with the remaining sauce and sprinkle with mozzarella cheese. Cover with foil and bake for 25 minutes, then remove foil and bake for another 10 minutes until bubbly and golden. Let rest for 10 minutes before serving - this waiting is the hardest part, but it makes such a difference in how they hold together when you serve them.
Notes & Tips
-
1
If you can't find ground lamb, ground turkey or beef work beautifully too - just adjust the seasoning to complement the different meat
-
2
Fresh herbs make a huge difference here - if you must use dried, use half the amount and add them to the sauce instead of the filling
-
3
Let the rolls rest after baking - I know it's tempting to dig right in, but those 10 minutes of patience mean you'll get perfect slices instead of a delicious mess
-
4
You can make the sauce from scratch if you have time, but a good quality jarred marinara works perfectly for busy nights
-
5
If your noodles crack when rolling, don't panic - just patch them with another piece of noodle or extra cheese, it will bake together beautifully
 Easy Everyday Dinners
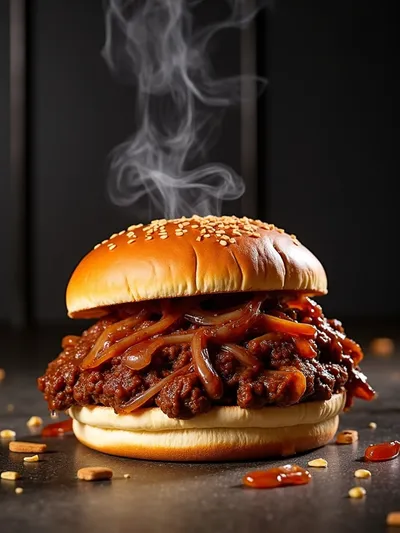
French Onion Beef Sloppy Joes – Easy Dinner
Hearty French onion beef sloppy joes with caramelized onions and a savory, sweet sauce.
Tools You'll Need
-
Large pot for boiling noodles
-
9x13 baking dish
-
Skillet for browning meat
-
Mixing bowls
-
Wooden spoon
-
Offset spatula for spreading
-
Clean kitchen towels
Must-Know Tips
-
Don't overcrowd the pot - Cook noodles in batches if necessary to prevent sticking
-
Pat noodles dry - Excess water makes rolling difficult and can water down your sauce
-
Taste as you go - Season each component separately for perfectly balanced flavor
Professional Secrets
-
Add a splash of pasta water - To the sauce for better cohesion and silky texture
-
Brown the meat well - Deep caramelization equals deep flavor in the final dish
-
Rest before serving - Allows the structure to set for cleaner slicing

Recipe by
Isabella MooreFood makes every celebration brighter 🎉🍽️ Creating magical seasonal moments with delicious recipes ✨
Get Delicious Recipes Weekly
Join 25,000+ home cooks getting our best recipes straight to their inbox.
Free forever • No spam • Unsubscribe anytime