
I remember my grandmother's hands, always dusted with a little bit of flour, expertly crimping the edges of a pie crust. She never used a recipe, not one written down anyway. It was all by feel, by memory, by the way the dough felt between her fingers. Her chicken pot pie was legendary in our family, the kind of meal that could fix anything. She'd serve it on a rainy Sunday, the windows fogged up from the warmth of the oven, and we’d all sit together, quietly scooping up every last bit. It tasted like safety and love. Recreating it has been a gentle journey, and I've found that this recipe comes so, so close to hers. It has that same soul-warming quality as other classics like a good French onion soup or a hearty beef stew, proving that some things are just timeless.
Why You'll Love This Recipe
-
Utterly Comforting: The combination of a creamy, savory chicken and vegetable filling with a flaky, buttery crust is honestly the definition of comfort food. It’s like a warm hug from the inside out, perfect for those days when you just need a little extra coziness in your life. Each bite feels nostalgic and deeply satisfying.
-
Surprisingly Simple: Look, I know a pot pie can seem intimidating, but this recipe breaks it down into such manageable steps. Using a good quality store-bought pie crust saves so much time without sacrificing that homemade feel. It’s one of those impressive meals that’s secretly easy, making it perfect for easy everyday dinners.
-
A Family Favorite: This is one of those rare dishes that everyone at the table agrees on. It’s hearty, flavorful, and has that classic appeal that pleases both kids and adults. The gentle flavors are welcoming, not overpowering, and it just feels special to pull a golden-brown pie out of the oven to share.
-
Perfect for Make-Ahead: Life gets busy, and I love a recipe that understands that. You can prepare the entire filling a day or two in advance, so when you’re ready to bake, all you have to do is assemble and pop it in the oven. It makes a stunning weeknight meal feel completely effortless.
This recipe is pure nostalgia. The crust is perfect every time!
Essential Ingredient Guide
- Pie Crust: Honestly, don't feel pressured to make your own crust from scratch unless you truly love the process. A high-quality, all-butter store-bought pie crust can be your best friend here. Look for one in the refrigerated section; it has a beautiful, flaky texture and a rich flavor that complements the creamy filling perfectly. Let it come to room temperature for a few minutes before unrolling to prevent cracking. It's the secret to making this dish accessible on a busy weeknight.
- Rotisserie Chicken: Here's another wonderful shortcut that saves so much time and adds incredible flavor. A store-bought rotisserie chicken is already cooked, seasoned, and wonderfully moist. Simply shredding the meat gives you tender, flavorful chicken without having to poach or roast it yourself. I find it makes the filling taste like it's been simmering for hours. Of course, you can use any leftover cooked chicken you have on hand.
- Heavy Cream: This is what gives the filling its luxurious, velvety texture. Please don't be tempted to substitute with milk or half-and-half if you can help it; the richness of the heavy cream is what makes the sauce so comforting and satisfying. It balances the savory flavors of the chicken broth and herbs, creating a sauce that coats every single piece of chicken and vegetable beautifully. It’s a little indulgence that makes all the difference.

Complete Cooking Process
-
Preparation:
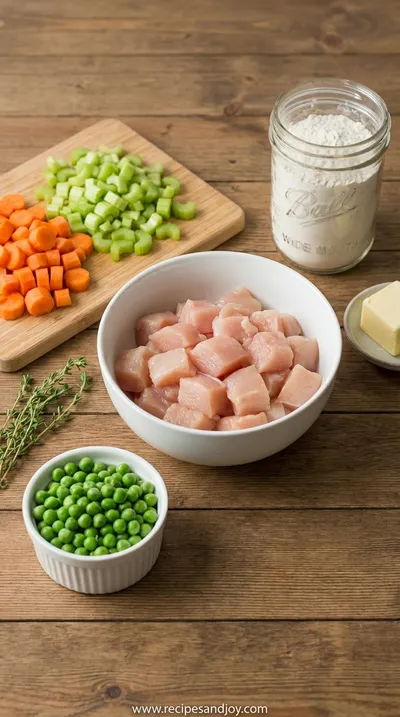
First, we get everything in its right place. I love this part of cooking; it’s so calming. You’ll gently dice your onion, carrots, and celery—the classic mirepoix that builds the flavor foundation. I like to keep the pieces relatively small and uniform so they cook evenly and every spoonful has a little bit of everything. Then, shred your lovely rotisserie chicken, making sure to discard any skin or bones. Finally, unroll your pie crust and let it rest on the counter for a few minutes. It just makes it more pliable and easier to work with. This moment of quiet prep is when the kitchen starts to feel like a sanctuary.
-
Creating the Filling:
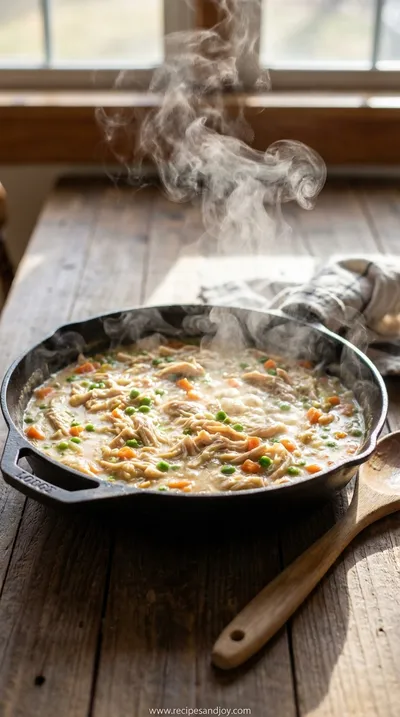
Now for the magic. You’ll start by melting butter in a Dutch oven or large pot, and then you’ll soften the vegetables until the onions are translucent and fragrant. Ugh, that smell is just the best. Next, you'll whisk in the flour to create a roux, which will thicken our sauce beautifully. Slowly, you’ll pour in the chicken broth and cream, whisking constantly until it's smooth and begins to bubble and thicken. It’s so satisfying to watch it transform into a luscious, creamy sauce. Stir in the shredded chicken, frozen peas, and herbs, and let it all mingle together. The filling is very similar to a wonderful chicken stew at this point.
-
Assembly and Baking:
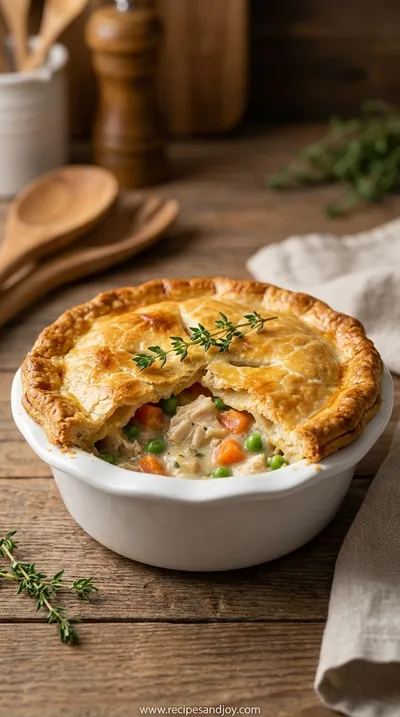
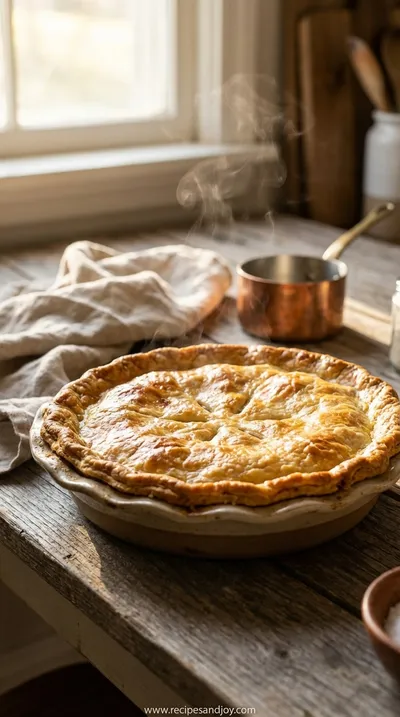
This is where it all comes together. Pour that glorious, creamy filling into your pie dish. Gently lay the pie crust over the top. Don’t worry about perfection here; rustic is beautiful. You can trim the excess crust and crimp the edges with a fork, or just fold them over for a more free-form look. I always cut a few small slits in the top to let the steam escape—this prevents a soggy crust. A little egg wash brushed over the top is the secret to that gorgeous, shiny, deep golden-brown finish. Then, into the oven it goes until it's bubbly and beautiful.
-
Ensure your filling has cooled slightly before adding the crust. A very hot filling can start to melt the butter in the pastry, leading to a less flaky result.
-
Place your pie dish on a baking sheet before putting it in the oven. This will catch any potential spills if the filling bubbles over, saving you a cleanup headache later.
-
Let the pie rest for at least 10-15 minutes after baking. This allows the creamy filling to set up a bit, so it doesn't run everywhere when you slice into it.
Pro Tips
These small details really elevate the final pie from good to absolutely unforgettable. It’s the little moments of care that make a dish special.
Frequently Asked Questions
→ Can I make this chicken pot pie ahead of time?
Yes, absolutely! This is one of the best things about this recipe. You can prepare the filling up to two days in advance and store it in an airtight container in the refrigerator. When you're ready to bake, just pour the chilled filling into the pie dish, top with the crust, and bake as directed. You may need to add about 5-10 extra minutes to the baking time since the filling is cold.
→ Can I use a homemade pie crust?
Of course! If you have a favorite pie crust recipe and the time to make it, it will be absolutely wonderful. A homemade crust adds another layer of love to the dish. Just prepare your favorite single-crust recipe and use it to top the pie. Both all-butter and shortening-based crusts work beautifully here, so use whichever you prefer the taste and texture of.
→ What other vegetables can I add to the filling?
This recipe is so versatile, so feel free to get creative with the vegetables. Sliced mushrooms, green beans, corn, or even diced potatoes would be lovely additions. If using potatoes, I'd recommend dicing them small and boiling them for a few minutes until slightly tender before adding them to the sauce to ensure they cook through completely. It's a great way to use up whatever you have in the fridge.
→ How do I prevent a soggy bottom crust if I want a double-crust pie?
If you decide to make a double-crust pie, the key is to manage the moisture. I recommend pre-baking (or blind baking) the bottom crust for about 15-20 minutes at 400°F (200°C) before adding the filling. This creates a barrier and helps it stay crisp. Also, make sure your filling isn't too thin or watery and has cooled down before you pour it into the pre-baked shell.
→ Can this recipe be made dairy-free or gluten-free?
Yes, with a few adjustments. For a dairy-free version, you can use a plant-based butter substitute and full-fat coconut milk or a dairy-free cooking cream in the filling. For gluten-free, use your favorite gluten-free pie crust and thicken the sauce with a cornstarch slurry or a gluten-free all-purpose flour blend instead of regular flour. The results are just as comforting and delicious.
→ Can I make individual pot pies?
Oh, that's such a lovely idea! Individual pot pies feel so special. Simply divide the filling among 4-6 oven-safe ramekins or small bowls. Then, cut circles from your pie crust that are slightly larger than the tops of the ramekins. Lay the crust over each one, crimp the edges, brush with egg wash, and cut a small steam vent. Bake for about 20-25 minutes, or until the crust is golden and the filling is bubbly.
→ What if I don't have heavy cream?
While heavy cream gives the best results for richness, you can substitute it in a pinch. Half-and-half is the next best option. You could also use whole milk, but the sauce will be a bit thinner. If using whole milk, you might want to increase the flour by about a tablespoon to help thicken it up a bit more. The flavor will still be wonderful, just a little less decadent.
→ Are there any vegetarian or vegan alternatives to this recipe?
Definitely! The concept of a pot pie is wonderfully adaptable. For a vegetarian version, you can use a mix of hearty vegetables like mushrooms, potatoes, and root vegetables, and use vegetable broth. For a fully vegan pie, you can build on that with a recipe like this old-fashioned vegan stew or a hearty vegan stew as the filling, and use a vegan pie crust and plant-based butter and cream. Even the vegan French onion soup has that same cozy vibe.
Nutrition Facts
per serving
550
Calories
28g
Protein
30g
Carbs
35g
Fat
Taste Profile
Rich, savory, and creamy with herbal notes from thyme and a buttery crust.
Ingredient Substitutions
Don't have an ingredient? Try these alternatives
For a slightly lighter version, you can use half-and-half. Evaporated milk also works well to provide creaminess without as much fat. The sauce might be a touch less rich, but still delicious.
A bag of frozen mixed vegetables (peas, carrots, corn, green beans) is a fantastic shortcut. You can use it in place of the fresh carrots and celery as well, just sauté the onion first and add the frozen mix with the peas.
Recipe Variations
Try these delicious twists on the original
Beef Pot Pie
Substitute the chicken with leftover cooked beef from a roast or stew. Use beef broth instead of chicken broth for a deeper, richer flavor. A splash of Worcestershire sauce in the filling is also a fantastic addition.
Biscuit-Topped Pot Pie
Instead of a pie crust, top the filling with your favorite drop biscuits. Spoon the biscuit dough over the hot filling and bake until the biscuits are golden brown and cooked through. It's a slightly different but equally comforting experience.
Common Mistakes to Avoid
Learn from others' mistakes for perfect results
- Using a hot filling, which can make the bottom of the top crust steam and turn soggy.
- Forgetting to vent the crust, which can trap steam and lead to a wet filling and separated sauce.
- Overworking the pie dough if making from scratch, which develops gluten and makes the crust tough instead of tender and flaky.
- Not cooking the flour taste out of the roux. That one minute of stirring the flour into the butter and vegetables is crucial for a non-pasty tasting sauce.
Meal Prep & Storage
Make Ahead Tips
The filling can be made up to 2 days in advance and kept in an airtight container in the refrigerator. This is my favorite way to do it for a weeknight meal. When you're ready, simply pour the cold filling into your pie dish, top with the crust, and bake. You might need to add 5-10 minutes to the baking time to ensure it's heated all the way through.
Leftover Ideas
Leftover chicken pot pie is a joy. Store it covered in the fridge for up to 3 days. Reheating in the oven at 350°F (175°C) for 15-20 minutes is the best way to revive the flaky crust. You can also break up the leftovers, crust and all, and mix them with some pasta for a ridiculously decadent and easy next-day meal. Don't knock it 'til you try it!
Perfect Pairings
Serve this with...
Cooking Timeline
Prep all vegetables and shred the chicken.
Sauté the mirepoix until soft and fragrant.
Make the roux, whisk in liquids, and simmer the sauce until thickened. Stir in chicken and peas.
Assemble the pie: pour in filling, top with crust, brush with egg wash, and cut vents.
Bake for 30-35 minutes, then let it rest for 10 minutes before serving.
 Sweet Treats & Desserts
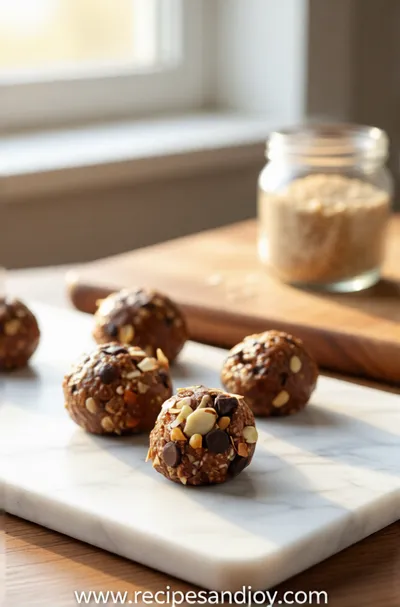
No-Bake Protein Energy Balls – Easy Healthy Snack
A simple, no‑bake bite of protein‑packed goodness you can carry anywhere.
Chicken Pot Pie Recipe: Classic Comfort Food
Make this delicious chicken pot pie with flaky crust and creamy filling. Perfect family dinner that's both comforting and satisfying.
Timing
Prep Time
20 Minutes
Cook Time
40 Minutes
Total Time
1 Hour
Recipe Details
Ingredients
For the Filling
-
01
3 tablespoons unsalted butter
-
02
1 medium yellow onion, finely diced
-
03
2 medium carrots, peeled and diced
-
04
2 celery stalks, diced
-
05
1/3 cup all-purpose flour
-
06
1 3/4 cups low-sodium chicken broth
-
07
3/4 cup heavy cream
-
08
3 cups shredded cooked chicken (from a rotisserie chicken is perfect)
-
09
1 cup frozen peas
-
10
2 teaspoons fresh thyme leaves (or 1/2 tsp dried)
-
11
1 teaspoon salt, or to taste
-
12
1/2 teaspoon black pepper
For the Crust
-
01
1 sheet refrigerated pie crust (from a 14-ounce package)
-
02
1 large egg, beaten with 1 tablespoon of water (for egg wash)
Instructions
First, let's create that beautiful, creamy base. In a large Dutch oven or heavy-bottomed pot, melt the butter over medium heat until it's foamy and fragrant. Add the diced onion, carrots, and celery. Let them cook gently, stirring occasionally, for about 8-10 minutes. You're not looking for them to brown, but to become soft and tender, and for the onion to turn translucent. This slow sauté builds a deep, sweet foundation of flavor for the entire pie. Your kitchen should be starting to smell amazing right about now.
Now, it's time to thicken things up. Sprinkle the flour over the softened vegetables and stir continuously for about one minute. This step is so important; you're cooking out the raw taste of the flour and creating a roux. Slowly, while whisking constantly, pour in the chicken broth. Keep whisking to avoid any lumps until the mixture is completely smooth. Then, pour in the heavy cream and continue to whisk. Let the sauce come to a gentle simmer and cook for a few more minutes until it has noticeably thickened. It should be thick enough to coat the back of a spoon.
With your sauce beautifully thickened, it's time to turn it into the hearty filling we all love. Remove the pot from the heat. Gently stir in the shredded chicken, the frozen peas (no need to thaw them first!), fresh thyme, salt, and pepper. Give everything a good, gentle stir to combine. Taste it at this point and adjust the seasoning if you feel it needs a little more salt or pepper. Let the filling cool for at least 10-15 minutes; this will help ensure your crust stays nice and flaky.
Preheat your oven to 400°F (200°C). Pour the slightly cooled filling into a 9-inch pie dish and spread it out evenly. Carefully unroll your pie crust and lay it over the top of the filling. Trim the excess dough around the rim, leaving about a 1/2-inch overhang. You can tuck the overhang under and crimp the edges with a fork for a classic look. Brush the entire surface of the crust with the egg wash for a beautiful golden sheen. Finally, cut 3-4 small slits in the center of the crust to allow steam to escape. Place the pie on a baking sheet and bake for 30-35 minutes, or until the crust is a deep golden brown and the filling is bubbling through the vents. Let it rest for 10 minutes before serving.
Notes & Tips
-
1
Don't skip the resting period after the pie comes out of the oven. I know it's tempting to dig right in, but allowing it to rest for at least 10 minutes is crucial. This gives the creamy filling time to set up, making it much easier to slice and serve without it all spilling out. It will still be perfectly hot, I promise.
-
2
Feel free to use leftover turkey from a holiday meal instead of chicken. It's an absolutely delicious variation and a wonderful way to give leftovers a new life. The flavor profile is very similar, and it works beautifully with the creamy sauce and vegetables.
-
3
For an extra layer of flavor, you can add a tablespoon of dry sherry or white wine to the vegetables just before you add the flour, letting it cook off for a minute. It adds a subtle depth and brightness to the filling that is really lovely. If you prefer not to, it's still completely delicious without it.
 Sweet Treats & Desserts
Healthier Hot Chocolate Recipe
Learn how to make a delicious healthier hot chocolate that's perfect for a cozy warm beverage.
Tools You'll Need
-
9-inch Pie Dish: A classic ceramic or glass pie dish is perfect for this recipe. The gentle, even heat distribution ensures the filling gets bubbly and the crust bakes to a perfect golden brown without burning.
-
Dutch Oven or Large Pot: A heavy-bottomed pot or Dutch oven is ideal for making the filling. It retains and distributes heat evenly, allowing you to soften the vegetables perfectly and simmer the sauce without scorching.
-
Whisk: A good whisk is essential for creating a smooth, lump-free sauce. It helps to incorporate the flour into the broth and cream seamlessly, resulting in that velvety texture we're after.
-
Baking Sheet: I always bake my pies on a rimmed baking sheet. It’s a simple trick that catches any potential drips from the bubbling filling, keeping your oven clean and saving you from a smoky kitchen.
Must-Know Tips
-
Cool the Filling Slightly: Don't pour piping hot filling into the pie dish and top with crust. Letting it cool for 10-15 minutes prevents the butter in the crust from melting prematurely, which is key to a flaky, not soggy, result.
-
Use an Egg Wash: Brushing the crust with a simple mixture of egg and water is the secret to that beautiful, shiny, deep golden-brown finish you see in bakeries. It makes the pie look as good as it tastes.
-
Vent the Crust: Cutting a few slits in the top crust is non-negotiable! It allows steam to escape as the pie bakes, which prevents the filling from becoming watery and the crust from getting soggy from trapped moisture.
Professional Secrets
-
Build Flavor in Layers: Don't just throw everything in the pot. Sautéing the aromatics (onion, celery, carrots) first until they are soft and sweet creates a deep flavor base that you can't achieve otherwise.
-
Fresh Herbs Make a Difference: While dried herbs work in a pinch, using fresh thyme adds a bright, earthy note that really elevates the filling. It's a small touch with a big impact on the final taste.
-
Low-Sodium Broth is Key: Using low-sodium chicken broth allows you to control the final saltiness of the dish. You can then season it perfectly to your own taste without it accidentally becoming too salty.

Recipe by
Isabella MooreFood makes every celebration brighter 🎉🍽️ Creating magical seasonal moments with delicious recipes ✨
Get Delicious Recipes Weekly
Join 25,000+ home cooks getting our best recipes straight to their inbox.
Free forever • No spam • Unsubscribe anytime